Archive for Technology

New “Insight” into Teaching with Technology!

Introduction to the Insight 360 system by eInstruction

I have been using eInstruction’s Mobi, MobiView and CPS Pulse clickers, along with their Workspace software now for several years.   At times, having to open different programs to run the clickers with the Mobi was a bit challenging, and sometimes I found it difficult to set up questions ahead of time.   All that has changed with the Insight360 system.

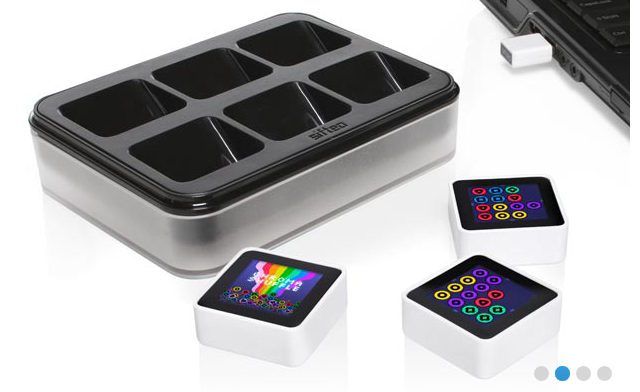
As you can see in the photo, the hardware that has replaced the Mobi and Mobi View looks exactly like the Mobi View (still with the touch screen- yay!), but with new software and menus.   The new software also run the Insight360 clickers and makes it seemless to use them in your classroom!  HUGE improvement!

The old Mobi and Mobi View can still be used with the system as student Mobis, which is great.   The new Insight 360 system makes it very simple to split the screen and allow students with a Mobi (or Mobi View) to write on the virtual whiteboard from their seat, so you don’t have to worry about not being able to use the old hardware!   You can even update your old CPS pulse clickers to the new system easily, rather than having to purchase new clickers!   *I prefer these clickers over other systems I have seen because they work extremely well WITH the Mobi (they are not just stand alone clickers).   From anywhere in the room, I can access live data coming from the clickers (my students) to make immediate decisions about how to change the course of my classroom instruction, and the system works with any software on your computer – like Powerpoint, anything on the internet, or even the Workspace software from the Mobi generation.  So teaching with this system does NOT tie you down to only one application to teach from on your classroom computer.

The best feature (OK, one of the best) is that now you can run the Insight 360 application from an iPad 2!   This frees up all existing Mobis or Mobi Views in your classroom to become student Mobis!   As you can see in the image below, they even went as far as to make a case to house the iPad to give it the look and feel of a Mobi!


I just started this week to use my new Insight360 system, so more information and photos to follow, along with opinions from my students on how they like learning from this new system.

The new  Insight360 is a finalist in the 2012 EdTech Digest Awards Program for the Cool Tool Ward!   EdTech Digest Awards 2012

To learn more about the new Insight360 system from eInstruction, you can visit their website.


Learning to Write His Name!

My Autistic Great Nephew: Update #2:

I heard back from my niece last week about how her autistic son is doing with the Livescribe smartpen and his iPad.

If you have not seen the earlier part of the story, click here.

The story left off where my niece was going to her son’s school for the IEP meeting…

She told me about how much he loves the sound dots and that every time they get a new book he gets so excited to “dot” it!  He brings her everything he owns with writing on it so they can put a sound dot on it.
Then she shared the sad news with me that they did have her son’s IEP meeting, but it was very frustrating.  “They don’t want to use any technology. They also don’t think it is a good use of time to attempt to teach him the alphabet. So we’re just going to keep working on it ourselves”

Lucky for her son, she did not give up!  I got this update from her last week:

“Exciting News!
Last week (her son) started writing his name on the iPad!
This week I got a letter home from the school saying they are willing to try to incorporate using his iPad into his academics at school. My hope is the next step will be for the instructors to start using the (smart)pen so that they can give him lessons that can translate into home use.”

Pretty amazing stuff!!  I am so glad he has her to advocate for him.  What a great thing for him to be able to write his name!

The Livescribe smartpen and his iPad have made a huge difference in my great-nephew’s ability to learn the alphabet and start to learn to read.

Amazing!


The Future of Educational Games – Sifteo Cubes

The future is NOW!

I came across an article a few weeks back on some amazing new technology for games and educational apps called Sifteo Cubes.


*image taken from the Sifteo website

I could see potential without even touching them!   I ordered a set (they come with three cubes) and they came right away. Within the first day I knew I had to have all six cubes, so I ordered a second to get down to the business of seeing what the full set could really do.

Right now there are not a lot of apps for the cubes, but anyone can download the Sifteo SDK and create their own apps for the cubes.   I think I have found a couple game programmers who are willing to work towards creating some educational apps that I have in mind to reinforce fractions and algebra concepts.   These cubes will be really amazing for math!

I created a short video of some of my favorite apps so you can see  how the cubes work.

If you decide to get a set, please write me and let me know how you plan on using them.


GlogsterEDU Projects for Students

CREATIVE ONLINE PROJECTS

Next week my students in my Math For Elementary Teachers class will be creating a Glog:  an interactive, online poster.   GlogsterEDU will allow them to create their Glog for free and publish it to their Google Website for the class.

I just finished creating a new Glog to show a few uses of the Livescribe smartpen in the classroom.  I plan on using this as an example when I teach them how to use GlogsterEDU.

Link to the Glog if you cannot see it above.

I will post some of their work when completed!


Creating a Text Embedded Interactive Worksheet with a Livescribe Smartpen

EMBEDDING TEXT BEHIND A LIVESCRIBE PENCAST PDF

Recently I learned how to embed text behind a Livescribe pencast and it has changed everything!

I created a short interactive worksheet to show what can be created with this process.   The following is a screenshot of the text embedded pencast because I cannot embed a PDF file (yet) into a website.   A link to the actual pencast PDF is below the screenshot.

Pencast PDF with text in the background
(you must have Adobe Reader 10.0 or higher to view this interactive PDF)

If that does not work, I put a link on my website for you to click on OUTSIDE of WordPress
(I have some issues with opening PDFs inside WordPress – if anyone can help me to embed
a PDF in WordPress or a website I would really appreciate it!)

As listed in the pencast, the steps to embed the text in the pencast PDF are as follows:

1.  Print off the text file onto Livescribe dot paper (I used college-ruled dot paper in my printer)

2.  Record a pencast on top of dot paper that has the text printed on it (the text shows you where to write!)

(sorry about the poor photo quality)

3.  Connect your smartpen and upload your pencast as a PDF (use the “Computer” connector)

As you can see in this screen shot, the pencast looks pretty strange without the text behind it!

4.  Save the original text document as a .jpg (image file) – to do this you must first save it as a PDF and then you can use Adobe Acrobat Pro or the free online utility Zamzar (www.zamzar.com) to save your PDF as a .jpg file

5.  Open the pencast PDF in Adobe Acrobat Pro or PDF Pro (http://epapyrus.com/en/)  so that you can add a watermark to the PDF file

6.  Add your .jpg text file as a watermark to your pencast PDF and re-save the PDF

7.  The new pencast PDF can be viewed by anyone with Adobe Reader 10.0 or higher


Please add comments on this blog if you know of other free ways to save a text document as an image file and also if you know of other (especially FREE) programs that allow the user to edit a PDF.

Please send me the projects you make – I would love to see them!


Update1 on “Help For My Autistic Great Nephew”

Help For My Autistic Great Nephew – update 1

A couple months ago I purchased a Livescribe smartpen (click for links within my blog) for my niece to use with her autistic son (I think that makes him my great-nephew?)    I showed her how to use it during a family reunion in the Outer Banks over the summer. (Here is a link to the previous article)

Ethan’s mom sent me the following “first impression” of using the Livescribe smartpen with her son, and gave me permission to post it.  Her autistic son Ethan is 9 years old:

Every child learns differently. Part of Ethan’s struggle has been that he does not learn by the same standardized methods that most children are able to use for learning.  He is great with technology, likes repetitiveness and although he does enjoy social interaction he does not like to “perform” when someone is trying to teach him something.  The smart pen allows us to combine and functionally utilize these traits.

Ethan does well with his iPad but unlike the pre-programmed educational apps, with the smart pen we can create our own learning material specific to his needs. For instance if he is struggling with the letter “A” he can sit down with his iPad on his own (in his own space) and replay (over and over) the note session that shows how to write “A” as well as hearing the sound.  It also allows me to focus on topics of interest for him. He loves baseball so we can practice spelling and writing sentences all tailored around “Ethan playing baseball.”

The sound stickers are also really cool.  We are able to record each page of a book on them so that Ethan is then able to “read” books to himself.  He enjoys reading books but at his age most kids are able to read to themselves. This allows Ethan to read/listen to his books independently when I am not available.  It also is great in that he is able to repeatedly hear the words in connection with seeing them over and over. ..because let’s face it, as a parent you can only read the same book over and over in one day before you lose your mind.

Ethan’s mom is using the Livescribe smarpen (click to go to the main Livescribe website) to write out the lessons she wants her son to learn, then uploading them to his iPad for him to interact with by hearing and watching the lesson.    She is using the sound (dot) stickers to record herself reading each page of his favorite books.  She then places a sticker on each page for  him to “read” the book by himself.  By tapping the sticker with his smartpen, he can hear the words on the page being read to him by his mother! 

I will continue keeping updates in this blog on how his first IEP meeting goes this year at school, and how his learning progresses with the use of the Livescribe smartpen.

Livescribe now has a website for solutions for teaching students with learning disabilities:
http://www.livescribe.com/en-us/solutions/learningdisabilities/


Getting Organized

ADDING MY VIDEOS TO THIS BLOG

I have heard from several people that they would like to see some of the educational videos I have created.  I realize there was a pull down menu at the top of my blog for it, but I never actually organized the content I have created in the past.

In the past 6 months I have had to wipe both my Mac and my Windows machine (long stories), so some of my videos are now “lost’, but luckily YouTube still has a small collection.

I finally got organized today and separated my videos into categories.  If you look along the top of my blog, you will see a category called “Animations/Videos” :


Most of my videos fall in to four categories of  “How-To” videos, “Educational Teaching Videos”, “Flash Animated Tutorials”, and “Livescribe pencasts”.  I will be adding some Animationish videos after this Fall when I have my students creating some.

I created the “How-To” videos to teach others how to use software or hardware.  Here are the categories I have in that section:

I plan on adding more videos to this section in the near future, so some of the categories do not have any links yet.

The next main category I have been creating videos for is in “Educational Teaching Videos”.  These are short videos I have created for my students to introduce a topic we are studying in the class.

As you can see when you look through the Educational Teaching videos, I was trying out several types of hardware/software to see what worked best.   I used the eInstruction Workspace software for a “whiteboard” in some videos, and recorded and edited with Camtasia studio.  In other videos I used a Lumens HD Ladibug document camera.  I found the document camera to be better for me when I am actually needing to record working with actual objects like base ten blocks and fraction circles.   I will hopefully be making more videos using these this semester. I will try to keep up with posting them here so I don’t lose them again!!

Most of the tutorials/lessons I have created for my students in the past year are Livescribe pencasts, but I find when I need the lesson to be more visual, a video is better.    My livescribe pencasts are organized by topic on THIS PAGE.  I have quite a few pencasts collected there.   When I had to wipe my computers, I lost all the original pencasts, so for now I cannot change any of those pencasts into PDF’s to download.

Lastly, about six years ago I started created Flash animated tutorials to help my students in my Math For Elementary Teachers classes better visualize the math they will be teaching. I strongly believe visualization is key to understanding!

The Flash animated tutorials are housed on a separate area (outside of my blog).   They are organized by arithmetic topic:

For example, clicking on the “1/3” would take you to the fraction tutorials, and the “2” will take you to the multidigit whole number operations.  This type of tutorial takes me a lot longer to create, so I do not have many in some areas (like decimals).   Instead, I am starting to create more interactive tutorials using Hyperstudio.  To see a few of those interactive tutorials, CLICK HERE.

These are still a work in progress, but I promise to continue adding here so check back!


New Livescribe Connectors For OneNote and Google Sites!

*Image taken from the Livescribe Facebook Page.

I downloaded the latest version of Livescribe desktop to try out the NEW connectors.   Livescribe just added Microsoft OneNote and Google Sites to their list of connectors!   Download the lastest desktop at:  http://www.livescribe.com/en-us/starthere 

connect
brought to you by Livescribe

Here is a screenshot of a Google website I created.  You can use the launch-line feature and write the words “Google Site” (the pen recognizes the words you want pretty quickly – or you can make a short cut like “sites” for it)


Every time you sync a new pencast to Google Sites, it creates a new webpage on your site and embeds the playable pencast on the page.  You can rename and edit the page any way you would like after the pencast is uploaded.    What a great way to share a test key or answer student questions so all students have access to it!

The other new Connector is for Microsoft OneNote.   I have read a lot of feedback from folks REALLY wanting this connector.   Since I use Evernote (a LOT), I haven’t really played with OneNote, but this gave me the perfect excuse to crack it open and start playing!

After syncing your pen using the OneNote Connector, when you open up Microsoft OneNote you see two things:

1)  A rough screen shot of your pencast, and

2)   An embedded Pencast PDF file that holds the entire pencast (includes both synced audio and animation)

If you double click on the PDF file in the upper right, it opens Adobe (10 or higher) and shows you the actual animated pencast.   This pencast is still in your OneNote notebook, but can also be shared with others.

The PDF pencast comes with a player that allows you to play, stop and scrub through the pencasts as you want.

You do not have to use launch-lines to use the connectors – they also show up in a menu on the left side of your Livescribe desktop:


All you need to do is sync your pen and then drag any “page” from your notebook onto one of the connectors – and you are done!

I already use the other connectors all the time, now I have even more choices to make my life easier.

I am looking forward to being able to create a Google Website that houses all the pencasts I upload for my students, so I can just post the link to the website for my students, rather than having to embed each new pencast I make manually.    This update for Connect is extremely helpful for me and will save me a LOT of time this semester!!

Loving all the new updates from Livescribe as they listen in on what their users really need “now”.  I can’t wait to see what is next!


Mapping my Syllabus (again)

I am rewriting a blog post from a year ago…

Last year I used a mindmap of my course syllabus to show them an example of mapping out something.  They will be mapping out at least one unit and bringing in new resources to share with the rest of the class this semester, so I decided to update my MindMeister mindmap to go with the new syllabus

Here is a link to the actual mindmap if you cannot see it above.

I will also be creating several other project samples for the students using the course syllabus – stay tuned!


Did I mention that MindMeister has an iPad app?!!


Screencaptures by TechSmith for the iPad!

While reading through posts on Google+, Facebook and Twitter by my PLN, I came across this valuable new FREE app for the iPad!   I use TechSmith products (Camtasia, Snagit and Jing) all the time on my laptops, but always wanted to have the same functionality for my iPad.  Not only did TechSmith follow through, but they made it FREE!

Opening up the ScreenChomp app, you see a blank whiteboard.

They have given us 12 colors to choose from (but I would like to see a slider for SIZE of the pen at some point in the near future!), an eraser and a record button – yes ScreenChomp will record a video of you writing and speaking at the same time!

When you save your file you have the option of saving it to the “cloud” by hitting the ScreenChomp.com button or sharing it on Facebook.

After saving your screencast, you have three options for sharing:   You can copy the link, email it or Tweet it!  Here is a link to the actual video I just made.   I need to find a way to embed the video without having to go through another application. Suggestions?

I think this will be a GREAT way to answer student questions from my iPad!  I just have to create a quick screencast on my iPad and then send it to them.   Can’t wait to try it out!


Analytics Plugin created by - Powered by Womens Sunglasses and Human Services Degree.