Archive for Interactive Projects

Creating More Engaging Videos

I wanted to share a blog post I wrote for my new business, On Demand Curriculum (www.ondemandcurriculum.com).   Normally, I don’t plan on posting the same content on both sites, but this one seemed appropriate here, since I am talking about the technology I used to create the Common Core in Action videos.

CCinAction

I recently finished designing and creating a set of professional videos for Pearson Higher Education called “Common Core In Action”.   It was such a fun project!  The videos are going to be used with math content texts for college students studying to be K-8 teachers. This particular set of videos shows how to teach some of the topics in elementary mathematics, to align with the Common Core Standards.

These videos would be a great resource for parents trying to understand their child’s homework, which could utilize many of these methods. Therefore, I am working with Pearson to try to get permission to set up a site where parents could view these valuable resources. Stay tuned!

I was given permission by Pearson to show a couple of screenshots from the videos.  I will talk about each screenshot in a separate blog post. The first video screenshot I want to show you is from a video entitled “Common Core in Action: Addition Algorithms”.

AdditionAlgorithm

To align to the Common Core State Standards when teaching addition, teachers often have the students use Place Value Disks. In this video I created a set of place value disks, where white disks are worth 1 (one) unit, and red disks are worth 10 (ten) units, to match the actual physical items elementary schools are using.   I also included 5-frames and 10-frames to help teach addition involving regrouping, which used to be called “carrying” when I was in elementary school.

I used Hyperstudio to design and build the background to my video because I wanted to be able to interact with the place value disks during the video, as I taught the lesson on adding whole numbers using place value.

In the screenshot of the video, the bottom row is comprised of the movable objects:

MovablePlaceValueDisks

I have created multiple copies of each object, sitting on top of one another.  During the video I “pick up” place value disks or 5-and 10-frames, as needed, and move them onto the place value board.   The eraser on the side of the screen (see the original screen shot) is used when I create subtraction videos, so that I am able to “erase” objects I am removing, or subtracting.

As I talk through the process of adding 28 and 34 in the video using place value disks, I actually move the disks into the appropriate columns in the place value chart shown.

ButtonToShowSum

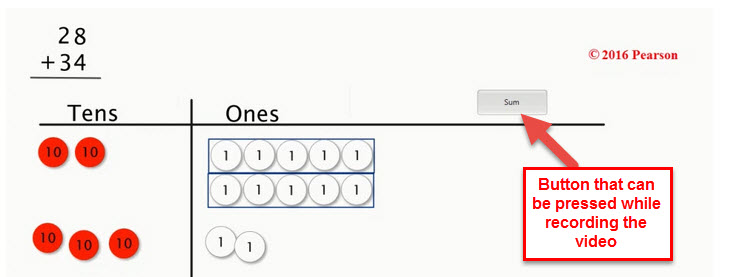
The screen shot shows the point in the video where I have 2 ten disks plus 3 ten disks. I also have 8 one disks plus 4 one disks, but in this screenshot I have already regrouped 10 of the one disks to create a set of 10 ones inside of a 10-frame.  This left me with one 10-frame of one disks and 2 one disks left over.   The next step in the video would show me trading the 10-frame for 1 ten disk, and moving the ten disk into the “Tens” column.  This allows me to explain in arithmetic where the “carried 1” comes from.

When I complete the process, and have the final tens and ones disks in the place value chart, I relate the place value disks to the final numeric representation of the sum by hitting the button on the screen labeled “Sum”. The screen will then show the number 62 (which is later in the video than this screen shot), where the digit 6 represents the 6 red ten disks which will be on the screen and the digit 2 represents the 2 white one disks that will be left on the screen.

If you would like me to create a video showing how to use classroom manipulatives to teach a topic in your curriculum, please contact me at sue@ondemandcurriculum.com, and I would love to work with you!

To see the original blog post go here:  http://www.ondemandcurriculum.com/common-core-in-action-part-i/


On Demand Curriculum – My Latest Adventure

Blog Post Header On Demand Curriculum

I have been very busy these past few years trying to build up my contract business with textbook companies.  I have created videos, PowerPoints, and other types of lessons for several large companies.

I was teaching full time and doing these contract jobs, trying to build up my business enough to retire from teaching in the classroom….well, that time finally came.   I retired in May 2015 from teaching at Mesa Community College, and have spent the past few weeks building a new business website so I will be able to share my experience with students, teachers, parents, home school businesses, along with other curriculum creation companies.

I am starting On Demand Curriculum by building up the first area, On Demand Math.  My goal is to make personalized math lessons and tutorials for students, based on their learning style, on demand.   In my experience, students who asked me a question during office hours tended to forget what they learned more quickly than students who asked me a question through email and receive a tutorial that I built just for them that they can watch as many times as they need to.  I want to take that concept and expand it so that more students across the globe can receive help, based on their individual needs.

I also realize that there are many parents out there struggling to help their child with their math homework.  I want to be there for them as well.   A quick tutorial, based on the question they are trying to help their child with, might make a real difference in the child starting to enjoy math (and the parents).

Please help me spread the word that I am now available to help everyone succeed in all levels of math!

You can follow On Demand Curriculum on the following social media sites:

Twitter as @OnDemandMath
Pinterest as OnDemandMath
Instagram as @OnDemandCurriculum
Facebook as On Demand Curriculum

Find out more information at www.ondemandcurriculum.com


Creating Animations and Video on the iPad using Doceri 2.0

Can I just start with “WOW”!?!

I got back from ISTE, overwhelmed with all the new and amazing tools and apps I learned about! Luckily the great folks at Doceri let me play with their beta 2.0 version (which should hit iTunes stores soon) and that made for an easy decision for me to start right there.

I get to use the iPad classroom (25 student iPads, 1 teacher iPad, and an Apple TV!!) to teach Intermediate Algebra in the Fall, so my focus at ISTE was to find iPad apps that allow students to create, not just to consume.   I hit the jackpot with the new version of Doceri!!  Not only can I create lessons, but the students will be able to create animations and videos as well, right from their iPads.

Here is a quick video I made using Doceri 2.0:

Link to the video on YouTube

The new version of Doceri (2.0) should hit the iTunes app store soon, and it is a HUGE update!

The new features I am so excited about are 1) it allows you to work directly from the iPad (without needing to connect to a computer), and 2) it now records your pen strokes allowing you to easily create animations and videos directly from the iPad!  INCREDIBLE!   You can even edit your animations and upload your videos to YouTube!

OK, before I get too far ahead of myself (I am just so excited!), here is the new opening screen on the iPad:
(By the way, I did get permission from Doceri to blog about the new version before it hits the iTunes store!)

opening screen

**UPDATE!  Doceri 2.0 will be in iTunes stores July 24, 2012!!!  

As you can see, Doceri 2.0 can now be used from the iPad alone, and even use Airplay if you are presenting (or just use the iPad at home to create a lesson!!!).

Starting a new project gives you a blank screen, which you can change to any color, use one of their backgrounds, or create your own.  They have included many helpful math backgrounds, along with maps, as well as colors and textures.

backgrounds


After you choose your background, you can start writing on the screen.  What you see at the top of the image below is the new RECORDING menu!!!  It records your writing strokes.  You can go back and edit them, speed them up, or slow them down.  You can even add stops and new slides to your project.  The record button on the top left allows you to record voice as well (while writing, or narrate even after you are done writing).

recording menu


 After recording a video, you have several options for exporting (on the right) to Facebook, YouTube, email, and to your images folder on the iPad.

export options


You can also open your recordings on your iPad with any app loaded that will play a .mov file, including Dropbox and Evernote, so you can access your recordings from any device!  (I also have TechSmith’s Fuse app installed on my iPad, so it found that app and listed it as well.)


The folks at Doceri created quite a few sample projects to help give ideas on how this new product can be used. Here is a screenshot of one of their videos (of course I chose math, but there are many other types as well):

Doceri Sample

*Once Doceri 2.0 hits the iTunes stores, you can pay for the ability to remove the Doceri watermark, and even add your own watermark.

Here is a link to the video version (I did not add any sound):  math 01 – related ratesDoceriSample

Links to 2 more videos I made using Doceri 2.0

Adding Fractions 2

Solving Quadratics by Factoring

Like the original Doceri Remote app, Doceri 2.0 can connect to your computer to share screens, but now there is a MUCH easier way to connect:

QR code

 If you have an iPad2, just point the camera at the QR code and you are automatically connected!  I tried it and it worked amazingly well.  Once you are connected to your computer, you can use your animations and videos to present a lesson to the class, or create one while you are presenting!

**I am using the term “animation” for those projects that do not contain sound.  All writing into the application is recorded and can be shown as animated or as still shots.   These can only be played from within Doceri.  Once you add sound, then a .mov file is created, so I am using the term “video” for the animations with sound added.

Here is the “official” list of updates for Doceri 2.0 (from Doceri):

What’s new in Doceri 2.0

You can now prepare Doceri Projects on the iPad without being connected to a Doceri Desktop AND you can present without a Doceri Desktop via Airplay. Audio recording has been added to create high quality screencast videos based on Doceri projects. In addition, more sophisticated drawing and authoring tools have been added, as well visual file management, improved placement of project timeline controls for easier presentation, and improved screen update time for remote desktop control.

Screencasting with Doceri

  • Create a live screencast as you present, or create, edit and perfect your project in advance and add an audio voice over later
  • Choose to save audio or delete and re-record without impacting your Doceri project
  • Videos may be shared via YouTube, Facebook or email and/or saved to the Camera Roll and any app that responds to video

New Drawing and Authoring Tools

  • New line tools (with snapping), geometric shapes (rectangle, ellipse) arrow tool and a new pen tool with realistic ink flow
  • Easy access to six user-defined favorites from the available drawing tools
  • Place photos from Camera Roll, Photo Stream or another application at any point in your project
  • The new lasso tool allows you to cut, copy, move and paste drawing objects
  • Choose between patterns, colors or create custom backgrounds on any slide in your project

Direct Controls for Keynote and Powerpoint

  • Launch a PowerPoint or Keynote presentation and use Doceri’s one-touch controls to advance your slides
  • Annotate over Keynote or Powerpoint (or anything shown on your desktop), creating a multipage Doceri project while keeping your original presentation file intact

 Completely Revamped File Management

  • Doceri files can now be stored on the iPad Duplicate, merge projects, and transfer to and from your desktop
  • Combine, resize and share screencasts to Facebook, YouTube, Camera Roll or email with a simple drag and drop
  • Full implementation of cross application file sharing allowing “open in” function to copy files in and out of Doceri 
 

My Student Hyperstudio Projects

Student Hyperstudio5 Projects

The final project I had my Math For Elementary Teachers do for the course was to create an interactive Hyperstudio Project.


The projects are too large to be viewed well inside my blog, so I have created a website to house them. The website is best viewed using Safari if possible, if not, just ignore the browser warning, as I have used a beta version of Hyperstudio to export them into HTML5 .

I have many of my student’s projects posted on a THIS WEBSITE.    Enjoy!


GlogsterEDU Projects for Students

CREATIVE ONLINE PROJECTS

Next week my students in my Math For Elementary Teachers class will be creating a Glog:  an interactive, online poster.   GlogsterEDU will allow them to create their Glog for free and publish it to their Google Website for the class.

I just finished creating a new Glog to show a few uses of the Livescribe smartpen in the classroom.  I plan on using this as an example when I teach them how to use GlogsterEDU.

Link to the Glog if you cannot see it above.

I will post some of their work when completed!


Creating a Text Embedded Interactive Worksheet with a Livescribe Smartpen

EMBEDDING TEXT BEHIND A LIVESCRIBE PENCAST PDF

Recently I learned how to embed text behind a Livescribe pencast and it has changed everything!

I created a short interactive worksheet to show what can be created with this process.   The following is a screenshot of the text embedded pencast because I cannot embed a PDF file (yet) into a website.   A link to the actual pencast PDF is below the screenshot.

Pencast PDF with text in the background
(you must have Adobe Reader 10.0 or higher to view this interactive PDF)

If that does not work, I put a link on my website for you to click on OUTSIDE of WordPress
(I have some issues with opening PDFs inside WordPress – if anyone can help me to embed
a PDF in WordPress or a website I would really appreciate it!)

As listed in the pencast, the steps to embed the text in the pencast PDF are as follows:

1.  Print off the text file onto Livescribe dot paper (I used college-ruled dot paper in my printer)

2.  Record a pencast on top of dot paper that has the text printed on it (the text shows you where to write!)

(sorry about the poor photo quality)

3.  Connect your smartpen and upload your pencast as a PDF (use the “Computer” connector)

As you can see in this screen shot, the pencast looks pretty strange without the text behind it!

4.  Save the original text document as a .jpg (image file) – to do this you must first save it as a PDF and then you can use Adobe Acrobat Pro or the free online utility Zamzar (www.zamzar.com) to save your PDF as a .jpg file

5.  Open the pencast PDF in Adobe Acrobat Pro or PDF Pro (http://epapyrus.com/en/)  so that you can add a watermark to the PDF file

6.  Add your .jpg text file as a watermark to your pencast PDF and re-save the PDF

7.  The new pencast PDF can be viewed by anyone with Adobe Reader 10.0 or higher


Please add comments on this blog if you know of other free ways to save a text document as an image file and also if you know of other (especially FREE) programs that allow the user to edit a PDF.

Please send me the projects you make – I would love to see them!


Getting Organized

ADDING MY VIDEOS TO THIS BLOG

I have heard from several people that they would like to see some of the educational videos I have created.  I realize there was a pull down menu at the top of my blog for it, but I never actually organized the content I have created in the past.

In the past 6 months I have had to wipe both my Mac and my Windows machine (long stories), so some of my videos are now “lost’, but luckily YouTube still has a small collection.

I finally got organized today and separated my videos into categories.  If you look along the top of my blog, you will see a category called “Animations/Videos” :


Most of my videos fall in to four categories of  “How-To” videos, “Educational Teaching Videos”, “Flash Animated Tutorials”, and “Livescribe pencasts”.  I will be adding some Animationish videos after this Fall when I have my students creating some.

I created the “How-To” videos to teach others how to use software or hardware.  Here are the categories I have in that section:

I plan on adding more videos to this section in the near future, so some of the categories do not have any links yet.

The next main category I have been creating videos for is in “Educational Teaching Videos”.  These are short videos I have created for my students to introduce a topic we are studying in the class.

As you can see when you look through the Educational Teaching videos, I was trying out several types of hardware/software to see what worked best.   I used the eInstruction Workspace software for a “whiteboard” in some videos, and recorded and edited with Camtasia studio.  In other videos I used a Lumens HD Ladibug document camera.  I found the document camera to be better for me when I am actually needing to record working with actual objects like base ten blocks and fraction circles.   I will hopefully be making more videos using these this semester. I will try to keep up with posting them here so I don’t lose them again!!

Most of the tutorials/lessons I have created for my students in the past year are Livescribe pencasts, but I find when I need the lesson to be more visual, a video is better.    My livescribe pencasts are organized by topic on THIS PAGE.  I have quite a few pencasts collected there.   When I had to wipe my computers, I lost all the original pencasts, so for now I cannot change any of those pencasts into PDF’s to download.

Lastly, about six years ago I started created Flash animated tutorials to help my students in my Math For Elementary Teachers classes better visualize the math they will be teaching. I strongly believe visualization is key to understanding!

The Flash animated tutorials are housed on a separate area (outside of my blog).   They are organized by arithmetic topic:

For example, clicking on the “1/3” would take you to the fraction tutorials, and the “2” will take you to the multidigit whole number operations.  This type of tutorial takes me a lot longer to create, so I do not have many in some areas (like decimals).   Instead, I am starting to create more interactive tutorials using Hyperstudio.  To see a few of those interactive tutorials, CLICK HERE.

These are still a work in progress, but I promise to continue adding here so check back!


Learning with Gizmos!

When I was at ISTE this past June, I had the good fortune to visit the Explorelearning booth.   I have seen some of their online math and science interactive simulations (called Gizmos) on their website before, but this time I really wanted to dig deeper.

I obtained a teacher subscription to their full site where I can create classes, and then add the Gizmos I want to each class.  The Gizmos even come with lesson plans and teacher created activities!  You can add your own classroom ideas to a Gizmo as well.

I set up my first class: Math For Elementary Teachers.   I then started adding some Gizmos for my students to view.

On the Explorelearning website the Gizmos are sorted by grade level and topic.   The first one I chose was an interactive lesson on factoring numbers.

A student can start with any number on the board they want, and then start factoring it by dragging the circles that are factors to the board.  There are great “how-to” videos that go with every Gizmo, in case the student (or the teacher) does not understand how to use the simulation.

When a student has run through the simulation as many times as they want, they can take the assessment at the end.   Some questions are visual, based on the Gizmo (like the example below), and some are numerical to see if they can go beyond using the Gizmo.

I will have my pre-service students evaluating and choosing their favorite Gizmos for different areas of Elementary mathematics this Fall semester.  I can’t wait to see their reactions to these amazing math and science simulations!


Summer Projects for Visual and Interactive Math

Visual Interactive Learning
I have been sitting here staring at my computer for the past week since I got back from an amazing time with a room full of extremely innovative teachers in San Francisco as part of the Livescribe Educational Advisory Board.

I keep staring at it not being able to decide where to start!  I have so many new ideas that I want to implement for the Fall, and now I have even more resourceful people to guide me when I get stuck!

Some of the big ones on my list I have already started working with, but I want to dig deeper and create projects for my students to interact with, and also projects for them to create:

Hyperstudio5 (Roger Wagner will be at ISTE this summer, so that will be fun!)
GeoGebra
Camtasia
Livescribe (new cool stuff coming next week!!)

The newest application I want to learn:

I have been playing with WolframAlpha for the past year, but I recently purchased Mathematica and I am excited to see what I can create with it! My goal is to create visual and interactive materials for Algebra and Geometry.    I will post as soon as I start building!  I am still watching the video tutorials for now.   I want to look further into the following links as well:

Wolfram Research STEM Initiative

Wolfram Faculty Program

Lastly, I NEED to learn Photoshop.   My oldest son currently creates all of my artwork for my projects, but in a few years he will be off to college and won’t be around to help me!

Hopefully between spending time with my family and attending ISTE and HI-TEC this summer, I will be able to dig deeper and create some projects for next Fall using some of these great interactive applications!


Creating INTERACTIVE activities with HyperStudio5!

Link to the official Hyperstudio website

In my spare time (ha ha) I have been playing with Roger Wagner’s Hyperstudio 5.   (Luckily Roger Wagner himself has been helping me!!)  What a fun program!    My goal is to create more INTERACTIVE activities and tutorials/videos for my students, without all the work of Flash.   Hyperstudio fits that goal amazingly well!   It is similar to PowerPoint, but far more incredible in my book!

I “finished” my first final draft (I keep “fixing it” so it is forever in draft mode) of an interactive tutorial on introducing combinations and counting, and posted the project on a new area of my website with the button “HyperStudio Projects”.

Before clicking on the link below that will take you to the Hyperstudio stack, you must first make sure you are using either Safari or Internet Explorer, because these are the only browsers that have the Hyperstudio web-brower add-on for now.   To get the browser add-on, go to:  http://www.mackiev.com/support_hs.html , click on the proper computer type, then get the browser add-in for either Safari or Internet Explorer, then you will be able to view and PLAY WITH the activity.

Here is the direct link to my first project: http://www.tech4mathed.com/HyperStudio/IceCream_SG.html

If you have the browser add-on correctly installed you should see the following screen:

Once the stack is finished loading, the screen should look like:

Now you are ready to click on “go to STORY”.

I created the story like a video, and I narrated every screen, so you can  hear the narration if you click on the button. The audio level needs some work, some of the narration is too quiet and I will need to redo those sections.  The most fun part of it, however, is the INTERACTIVITY that was easy to create!

In this activity, I created an Ice Cream Playground, where you can actually move around all the objects on the page to explore and find the answer before viewing the explanation of the solution.  My 14 year old son did all of the artwork for me!   It is wonderful having a live-in artist on hand!

Please give it a try and let me know what I can do to make it more interesting for my students.   I also need to know if you are able to view it on a Mac and on a Windows machine.  Some Windows machines can view it and some cannot, so I am trying to trouble-shoot which versions of Windows have difficulty to help find a fix for that.

I am excited to make more projects and play with Hyperstudio!


Analytics Plugin created by - Powered by Womens Sunglasses and Human Services Degree.