Tag Archive for math

Math and Music

Upright Bass

Several years ago I began my lifelong dream of learning to play the acoustic guitar. More recently, I added learning bass guitar to my music journey.

I am fascinated by the connections I am seeing between math and music and want to share my findings. I will be adding new content to this blog, which will include topics related to music, math, and teaching music with technology.

Join me on my mathematically musical adventure.


Graphing Calculator Emulator

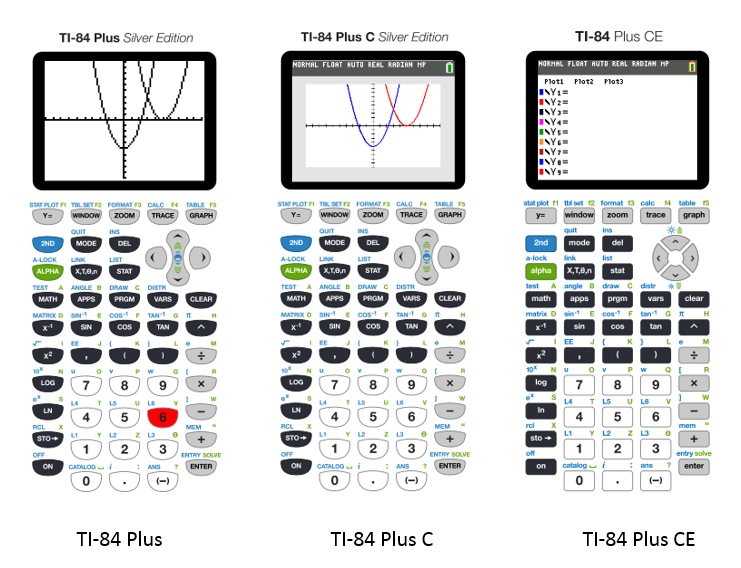
I just purchased a newer version of the TI graphing calculator emulator, the TI SmartView CE for the TI-84 family.  Wow, it is really nice!  It has 3 versions of the calculator:  The traditional black/white TI-84 Plus version,  the new TI-84 Plus C, and TI-84 Plus CE, which are both in color!

3CalculatorVersions

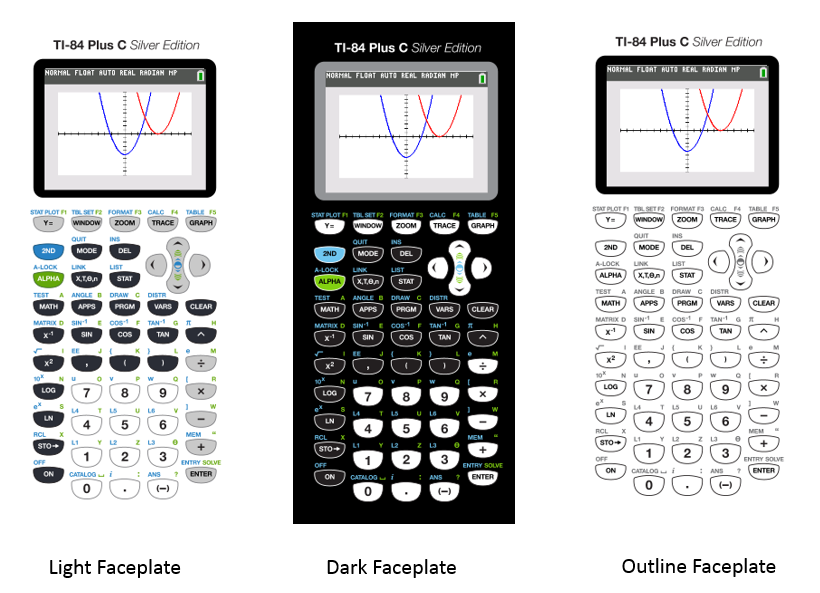
The calculator shows up well on the screen, with choices of using a light, dark or having just an outline for the calculator body style.

3FaceplateColors

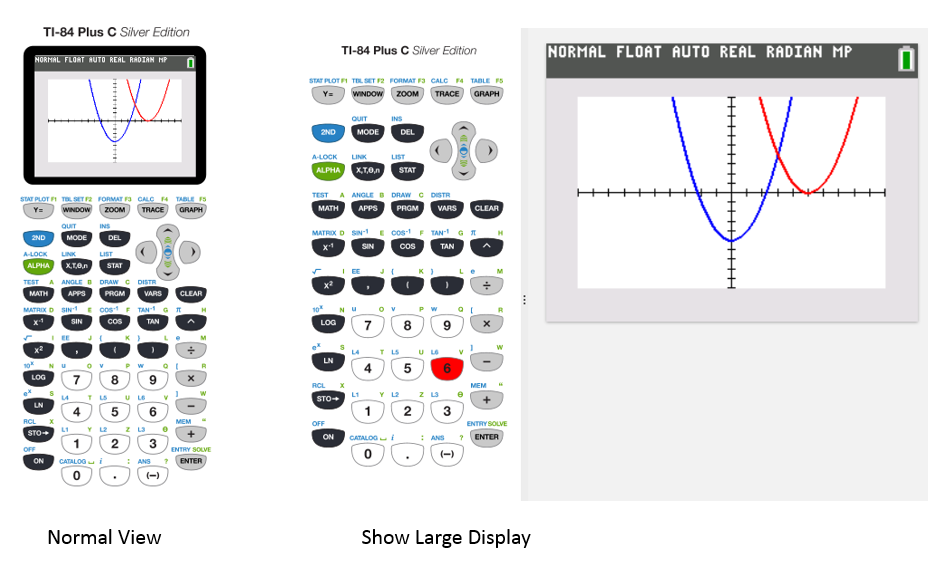
I have always liked the fact that the emulator will allow the user to make the calculator screen larger.  This helps considerably when showing the students live during a class or taking screenshots of the output.

NormalAndLargeDisplay

With the added benefit of color, it will help students see the difference more quickly when graphing more than one graph or plot at a time.   They have a free 90 day trial if you have not already tried out the new emulator, I would highly suggest it!

I plan on using the new emulator to create tutorials that include the graphing calculator for On Demand Curriculum.


Published Work in New Edition!

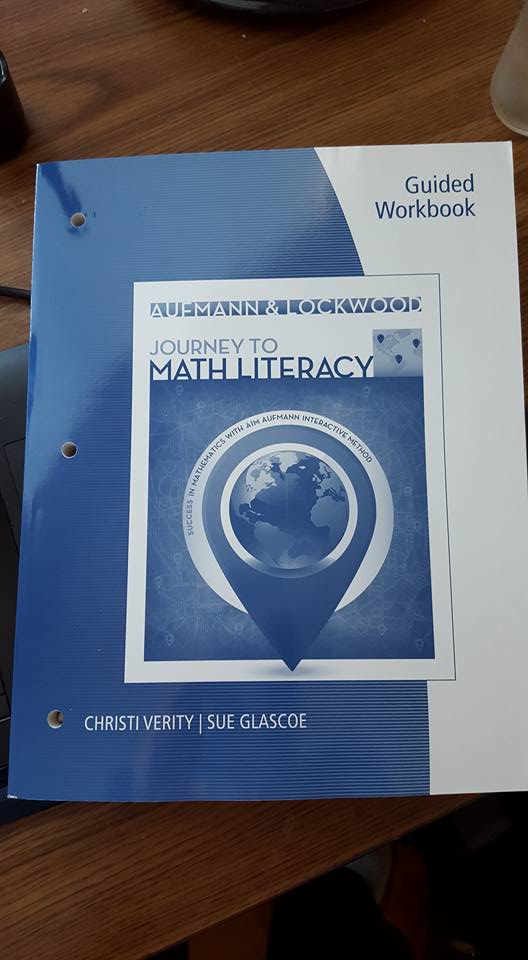
I don’t usually work on printed materials for textbook companies (only digital materials such as videos and Power Points), but several years ago I was asked to create a student workbook.   It was a new and interesting experience for me!

Apparently it was revised recently to create a new edition, and it came in the mail.  Pretty cool having my name on something!  I have created about a thousand professional videos for textbook companies, but they don’t have my name on them.  I don’t mind because I really enjoy creating digital media.   It allows me to continue teaching students all around the world, and I get to work from anywhere, including my sailboat!

Workbook


Common Core in Action Part II

CCinAction2

I recently wrote about the video series I created for Pearson, entitled Common Core in Action.  I wanted to share one more screen shot from the videos and talk a little bit more about what using Hyperstudio can do to make videos more engaging and visually appealing for students.

Here is a screen shot from the video entitled “Common Core In Action: Adding Fractions”.

AddingFractions

The screenshot above is showing the portion of the video where I am adding two fractions with a common denominator of sixths.   The sixths are visually represented by purple one-sixth fraction strips.

I used Hyperstudio to create the stage for my video because I can move objects around the stage during the video.  In this case, I used the stack of one-sixth strips on the bottom of the screen to show two-sixths plus five-sixths as adding a set of 2 purple one-sixth strips and 5 more purple one-sixth strips to obtain 7 of the purple one-sixth strips.

The point in the video where this screenshot is taken, is where I am showing how the improper fraction seven-sixths, can be turned into a mixed number by bringing a red strip to the stage, which is worth one whole.  Lining up the purple one-sixth strips along the edge of the red one-whole strip, I am able to show that 6 of the one-sixth strips are equal in length to the one-whole red strip, leaving me with 1 one-sixth strip left over.  Having the ability to move around the fraction strips during the video makes it easier to explain visually why seven-sixths is the same as one and one-sixth.

Using the fraction strips is important to the Common Core Standards for explaining WHY a common denominator is needed when adding fractions, and not just having the student perform an algorithm by showing them “how” to add fractions.

EquivFractionPlaygroundImage

To give you a better idea of what the fraction strips can do for students when I use them in fraction lesson videos, I created a small video where I move around the fraction strips showing how to visualize equivalent fractions.  You can see that HERE.

In the screen shot above, I have created all of my fraction strips so that they are relative in size to the red one-whole strip.  For example, it takes 2 of the one-half strips to equal the one-whole strip, 3 of the one-third strips, 4 of the one-fourth strips, and 6 of the one-sixth strips.   Another reason I use Hyperstudio, rather than real fraction strips and a document camera to create the videos I teach with, is because I can create any size and color fraction strips I want.

If you would like me to create a lesson for you, please send me details about the manipulatives (like fraction strips) you would like me to use, along with desired colors, and I will design and create a personalized video lesson for you, on demand!


Creating More Engaging Videos

I wanted to share a blog post I wrote for my new business, On Demand Curriculum (www.ondemandcurriculum.com).   Normally, I don’t plan on posting the same content on both sites, but this one seemed appropriate here, since I am talking about the technology I used to create the Common Core in Action videos.

CCinAction

I recently finished designing and creating a set of professional videos for Pearson Higher Education called “Common Core In Action”.   It was such a fun project!  The videos are going to be used with math content texts for college students studying to be K-8 teachers. This particular set of videos shows how to teach some of the topics in elementary mathematics, to align with the Common Core Standards.

These videos would be a great resource for parents trying to understand their child’s homework, which could utilize many of these methods. Therefore, I am working with Pearson to try to get permission to set up a site where parents could view these valuable resources. Stay tuned!

I was given permission by Pearson to show a couple of screenshots from the videos.  I will talk about each screenshot in a separate blog post. The first video screenshot I want to show you is from a video entitled “Common Core in Action: Addition Algorithms”.

AdditionAlgorithm

To align to the Common Core State Standards when teaching addition, teachers often have the students use Place Value Disks. In this video I created a set of place value disks, where white disks are worth 1 (one) unit, and red disks are worth 10 (ten) units, to match the actual physical items elementary schools are using.   I also included 5-frames and 10-frames to help teach addition involving regrouping, which used to be called “carrying” when I was in elementary school.

I used Hyperstudio to design and build the background to my video because I wanted to be able to interact with the place value disks during the video, as I taught the lesson on adding whole numbers using place value.

In the screenshot of the video, the bottom row is comprised of the movable objects:

MovablePlaceValueDisks

I have created multiple copies of each object, sitting on top of one another.  During the video I “pick up” place value disks or 5-and 10-frames, as needed, and move them onto the place value board.   The eraser on the side of the screen (see the original screen shot) is used when I create subtraction videos, so that I am able to “erase” objects I am removing, or subtracting.

As I talk through the process of adding 28 and 34 in the video using place value disks, I actually move the disks into the appropriate columns in the place value chart shown.

ButtonToShowSum

The screen shot shows the point in the video where I have 2 ten disks plus 3 ten disks. I also have 8 one disks plus 4 one disks, but in this screenshot I have already regrouped 10 of the one disks to create a set of 10 ones inside of a 10-frame.  This left me with one 10-frame of one disks and 2 one disks left over.   The next step in the video would show me trading the 10-frame for 1 ten disk, and moving the ten disk into the “Tens” column.  This allows me to explain in arithmetic where the “carried 1” comes from.

When I complete the process, and have the final tens and ones disks in the place value chart, I relate the place value disks to the final numeric representation of the sum by hitting the button on the screen labeled “Sum”. The screen will then show the number 62 (which is later in the video than this screen shot), where the digit 6 represents the 6 red ten disks which will be on the screen and the digit 2 represents the 2 white one disks that will be left on the screen.

If you would like me to create a video showing how to use classroom manipulatives to teach a topic in your curriculum, please contact me at sue@ondemandcurriculum.com, and I would love to work with you!

To see the original blog post go here:  http://www.ondemandcurriculum.com/common-core-in-action-part-i/


On Demand Curriculum – My Latest Adventure

Blog Post Header On Demand Curriculum

I have been very busy these past few years trying to build up my contract business with textbook companies.  I have created videos, PowerPoints, and other types of lessons for several large companies.

I was teaching full time and doing these contract jobs, trying to build up my business enough to retire from teaching in the classroom….well, that time finally came.   I retired in May 2015 from teaching at Mesa Community College, and have spent the past few weeks building a new business website so I will be able to share my experience with students, teachers, parents, home school businesses, along with other curriculum creation companies.

I am starting On Demand Curriculum by building up the first area, On Demand Math.  My goal is to make personalized math lessons and tutorials for students, based on their learning style, on demand.   In my experience, students who asked me a question during office hours tended to forget what they learned more quickly than students who asked me a question through email and receive a tutorial that I built just for them that they can watch as many times as they need to.  I want to take that concept and expand it so that more students across the globe can receive help, based on their individual needs.

I also realize that there are many parents out there struggling to help their child with their math homework.  I want to be there for them as well.   A quick tutorial, based on the question they are trying to help their child with, might make a real difference in the child starting to enjoy math (and the parents).

Please help me spread the word that I am now available to help everyone succeed in all levels of math!

You can follow On Demand Curriculum on the following social media sites:

Twitter as @OnDemandMath
Pinterest as OnDemandMath
Instagram as @OnDemandCurriculum
Facebook as On Demand Curriculum

Find out more information at www.ondemandcurriculum.com


New Tech to Try!

I apologize for not writing more posts this semester, but I have been swamped with work and play 🙂

I just received the new wi-fi Livescribe smartpen called SKY today and I promise to write a blog post soon about the features and how I plan on using it.  Wi-fi opens the potential of the smartpen to be even smarter!! I can’t wait!

I have been using Doceri 2.0 along with the Mobi 360 w/ clickers in my math classes and plan on updating all of you on how well that is going (it is going REALLY well, by the way)  and how I have used them with my students.

Stay tuned….


TI-nspire makes a GREAT math (or any subject) clicker!

I had given up on graphing calculators for a while, since I really wanted the students to engage more in class and use clickers. I found the perfect balance recently!

http://education.ti.com/calculators/products/US/home/

The calculators by themselves are pretty amazing, but there is a learning curve that made it too much for me to want to use them with my students.   However, I was recently introduced to the TI Navigator system, which turns this amazing calculator into an even more amazing clicker (student response system)!

http://education.ti.com/calculators/products/US/navigator/

That is worth trying out for me!   I have a loaner set I will use this Fall with my Algebra classes.
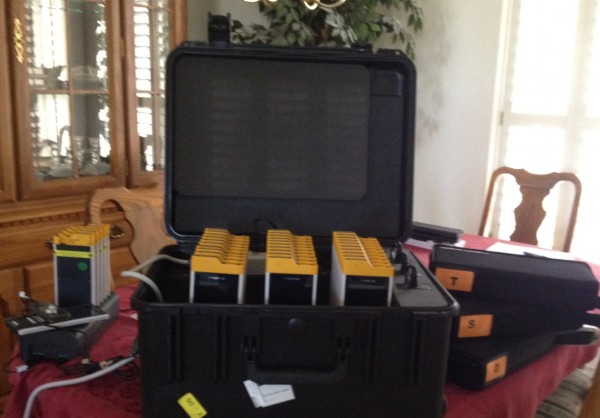
It is a bit bulky, but the case charges the calculators and allows me to send data to all of the calculators at once (if I don’t have the yellow Navigator caps on.  The case will not close with the Navigator caps on).
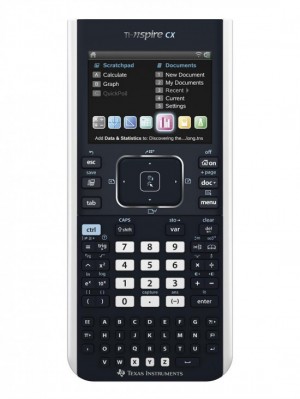
The calculator has a color screen, along with a mouse track pad and a full keyboard on the bottom.    Lots of handy math symbols are easy to get to directly from the keys as well.  (The calculator shown does NOT have the yellow Navigator cap on.)  But let’s get down to how to use this with the Navigator system!

I downloaded theTI-Nspire Navigator teacher software from their website and then set up a sample class with 5 students.   As you can see below, I named them Student 1, Student 2, Student 3, Student 4 and Student 5 (I am so creative!). You will create usernames for each student and then either create a password for them, or let them create their own.  You can also upload a CSV file into the system to automatically populate your class!
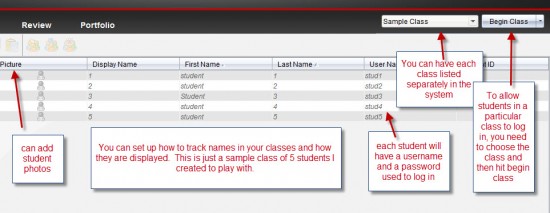
 

I am using the TI wireless network  access point  (it looks like a Verizon MiFi) to connect all the calculators to my computer, but you only have to set that up one time. Once you “Begin Class” (top right of the image above), then the students can log into ANY of the calculators (they don’t have to have the same one each time!) and make sure they are connected to the network you created.  It will tell them they are logged in, and they will show up on the teacher’s computer that way as well.

There are 2 main features I plan to use the calculators with the Navigator system for:  1. grabbing screen shots of all (or some) student calculators, and 2:  polling the students – asking them a question like using a clicker, but the question shows up on their calculator with the tools they need!

CALCULATOR SCREEN SHOTS

At any time during the class, I can grab live screen shots of all student calculators, or just one student’s calculator.   I think this will be very handy to “check in” on student progress to see where they are in solving the problem given or to see if they are even paying attention!
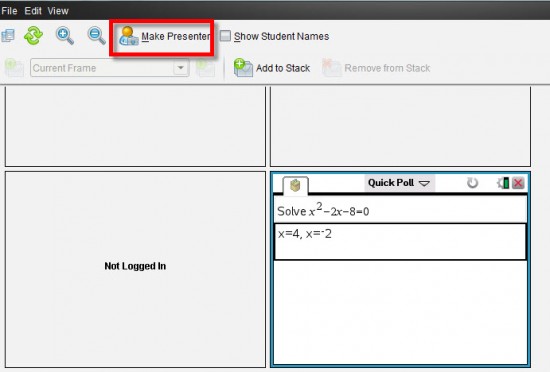
I can even “call on a student” to share their screen to see how they solved a problem (by making them the presenter).

POLLING STUDENTS

The 2nd, and main use, of the Navigator system with the TI-nspire calculators for me is using them to “poll students” during class.
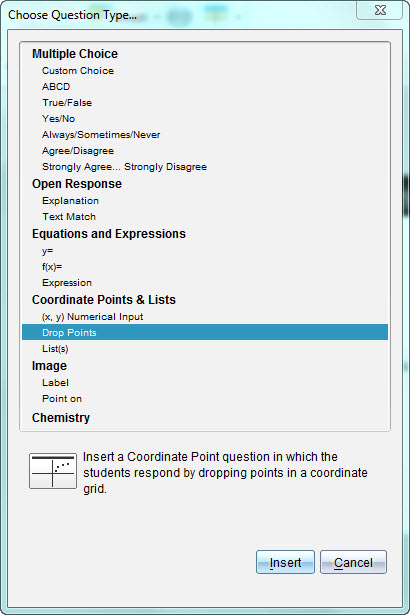
I was really amazed to see the variety of questions I can create and send to the students’ calculators!  Other clickers (student response systems) I have tried have a few of these options, but this is truly an incredible list for math!

In the above screen I chose the “Drop points” type of question, and typed in my question (see below).
I have a lot of math templates I can choose from as well, if I need to quickly type in a fraction or other math symbol.
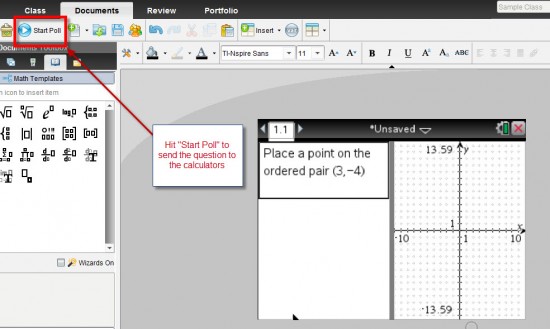
I created a question for the students to drop a point on the graph where the ordered pair (3,-4) is located.  That would not be possible on any other clicker I know of!  To send the question to the calculators I just hit the “Start Poll” button at the top of the screen.  I can create questions ahead of time, or real time during class, to poll the students with.
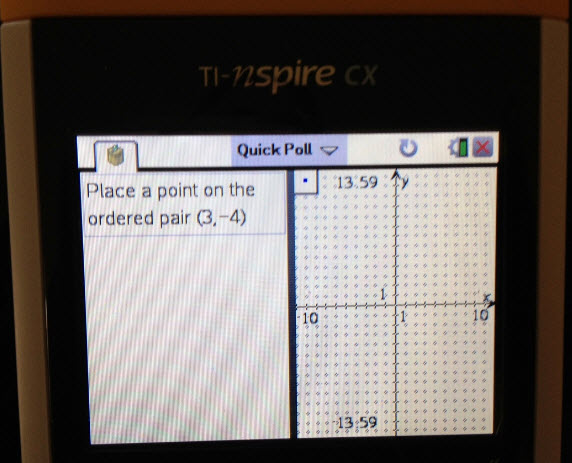
The photo above shows what was sent to the calculators.   As you can see they have a split screen with the question and a set of axes to plot their point on.  The students use the track pad on their calculator to move the point to the desired location.
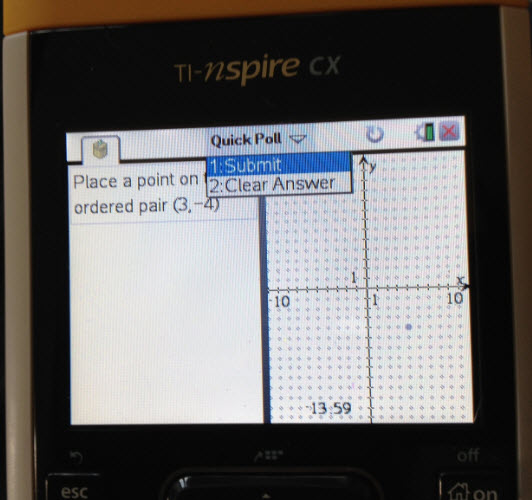
 

Once they have answered the question, they hit the “Doc” key and choose “submit” (they are submitting their document to my computer).  The teacher’s computer then shows that student has responded.

The teacher can hit “Stop Poll” at any time to stop the students from being able to answer the question any longer, and gather all the data.   The data is stored on the computer and the teacher can access it immediately, or look through individual student responses outside of class.

The system allows the teacher to set up questions where students can show steps, and the teacher can show multiple pieces of information in the question, like the question and a graph as seen below.
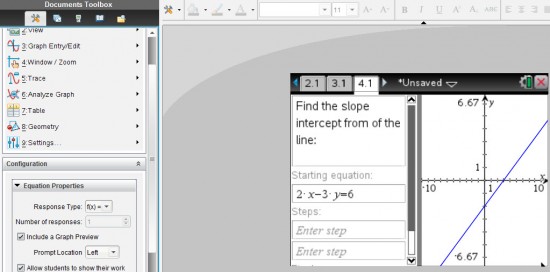
 

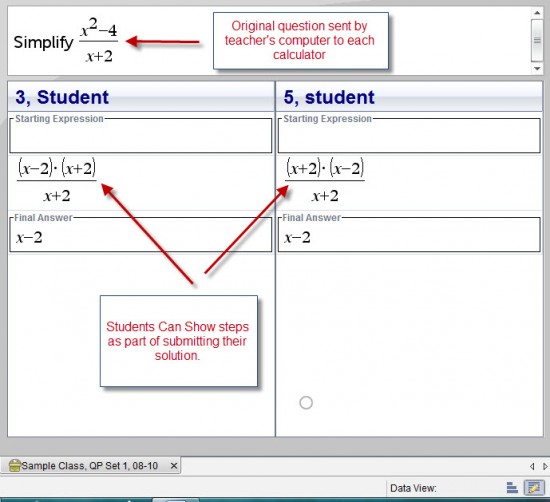
When the students submit their solution, the work is shown as you can see below (different question I was playing with).
The teacher can also look at the solutions of the class as a whole (another different question):

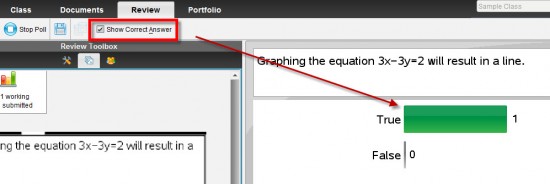
The question is always shown with the solutions given by the students., but this view is nice for the students to be able to see (anonymously) what the different answers looked like from the class.

If the teacher creates the question with a “correct answer”, then the solutions the students submit will be scored as correct or not (the teacher can even give more than one correct answer!).
I realize this is a lot of information at once, but I was hoping that some of you would be as excited as I am about using the TI-nspire CX with the TI Navigator system as a student response system (clickers) in class!

I will write more after I start using it in my Algebra classes and let you know how it is going.


An Intelligent iPad Stylus

I recently wrote about Doceri 2.0,  which comes out today ( July 24, 2012) at noon PST in iTunes stores!  The old version is called Doceri Remote, which was version 1.2.2 but the new version will just be called Doceri and will be version 2.0.

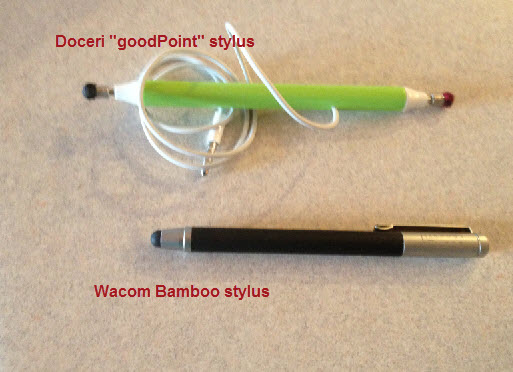
I thought I would follow up with a review of their “goodPoint” Intelligent stylus.  The stylus has a chord which plugs into the headphone jack; this allows it to be controlled in Doceri 2.0.

I normally use the Wacom Bamboo stylus, which I love, but I thought I would give this “Intelligent” stylus a try.

Doceri vs Bamboo

I tried both with Doceri 2.0, and I have to admit the extra features in the goodPoint stylus were really nice to have when creating animations!   The main features I appreciated were the fact that  you can get a very fine point that is consistent, and that it allows you to rest your hand on the screen while writing with it.    The back of the goodPoint is also an eraser.   I would have used it more, but I kept forgetting it was there, since I have never had a stylus with an eraser before.

To get a better feel for how it compared with my Wacom Bamboo stylus, I compared them with 4 of my favorite iPad apps.

Here are some screen shots comparing the two different stylus brands (2 screencasting apps, and  2 note taking apps).  You decide which has the better handwriting – some are close and some are not.  Sorry my handwriting is not great, but some apps do help it along more than others!

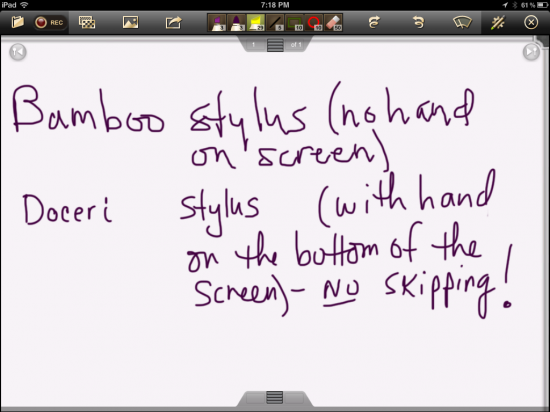
From within the Doceri application on my iPad:

Doceri comparison

Doceri goodPoint stylus wins here!

On the top of the screen, I tried to use the Wacom Bamboo stylus with my hand on the screen, but I could not.  Having to write with my hand not on the screen definitely made my hand writing worse (OK, it is not great anyway, but it was harder to write that way, and not as clear).  With the Doceri “goodPoint” stylus, I was able to rest my hand on the screen while I wrote, which was much more comfortable!  The writing was smoother as well.

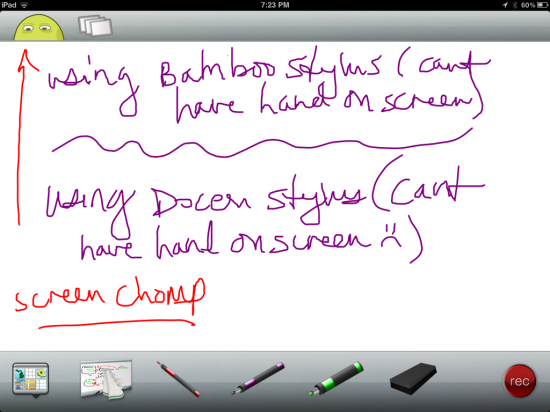
Before I found Doceri 2.0, I was using ScreenChomp as one of my favorite screencasting apps on the iPad.  Here is a comparison of Bamboo stylus and the Doceri stylus using ScreenChomp:

Screen Chomp comparison

Close, but since I can’t rest my hand on the screen with either, I would prefer to use the Bamboo stylus here (only because it does not have a chord).

As you can see the writing is similar using both (maybe a little better with the Doceri stylus?), but in both cases I was not able to rest my hand on the screen and still have the application let me write.   For me, that is a huge deal, as I am much more comfortable writing like I do on paper, with my hand on the surface while I write.

Next I thought I would compare my 2 favorite note-taking applications on the iPad (that allow me to hand write).

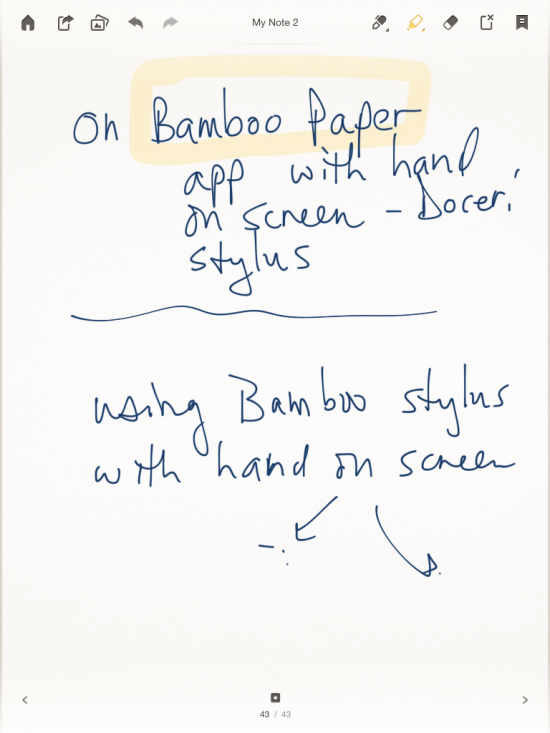
First I tried Bamboo Paper by Wacom:

Bamboo Paper comparison

Handwriting is close, but Doceri wins since I don’t want stray marks on my screen.

The good news was that the application allowed me to rest my hand on the screen while writing with both the Bamboo and the Doceri stylus, but as you can see in the screen shot above, the Wacom Bamboo stylus created extra marks when I did this, while the Doceri “goodPoint” stylus created no extra marks.  The hand writing seemed fairly similar to me, but it was nice not having to worry about marks when I set my hand on the screen with the Doceri stylus.

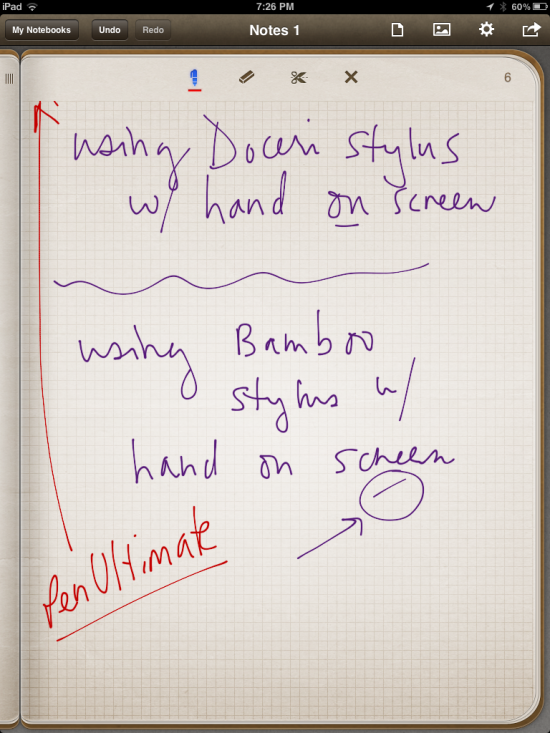
Finally, another note-taking app for the iPad I really like is called PenUltimate.  I thought I would compare with that app as well:

Pen Ultimate comparison

This app allowed me to rest my hand on the screen with both the Bamboo and the Doceri stylus.  However, Doceri stylus wins again, since I don’t want stray marks on my screen.

If you don’t mind the stray marks and some apps not allowing you to rest your hand on the screen, then the Wacom Bamboo stylus is a great choice.   However, given that I definitely prefer to place my hand on the screen and I don’t want any stray marks, then I prefer the Doceri goodPoint Intelligent stylus over the Wacom Bamboo stylus.

*Just a point of clarification: I was told by Doceri that the goodPoint stylus should really not do ANY better or worse than the Wacom (or any other stylus) for stray marks in apps other than Doceri.  The fact that it did for me is probably just a coincidence.  They agreed, though, that when using it in Doceri, the palm rejection is a major difference when using the Doceri stylus!


New “Insight” into Teaching with Technology!

Introduction to the Insight 360 system by eInstruction

I have been using eInstruction’s Mobi, MobiView and CPS Pulse clickers, along with their Workspace software now for several years.   At times, having to open different programs to run the clickers with the Mobi was a bit challenging, and sometimes I found it difficult to set up questions ahead of time.   All that has changed with the Insight360 system.

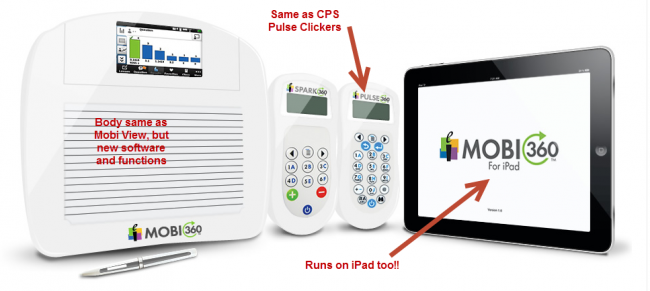
As you can see in the photo, the hardware that has replaced the Mobi and Mobi View looks exactly like the Mobi View (still with the touch screen- yay!), but with new software and menus.   The new software also run the Insight360 clickers and makes it seemless to use them in your classroom!  HUGE improvement!

The old Mobi and Mobi View can still be used with the system as student Mobis, which is great.   The new Insight 360 system makes it very simple to split the screen and allow students with a Mobi (or Mobi View) to write on the virtual whiteboard from their seat, so you don’t have to worry about not being able to use the old hardware!   You can even update your old CPS pulse clickers to the new system easily, rather than having to purchase new clickers!   *I prefer these clickers over other systems I have seen because they work extremely well WITH the Mobi (they are not just stand alone clickers).   From anywhere in the room, I can access live data coming from the clickers (my students) to make immediate decisions about how to change the course of my classroom instruction, and the system works with any software on your computer – like Powerpoint, anything on the internet, or even the Workspace software from the Mobi generation.  So teaching with this system does NOT tie you down to only one application to teach from on your classroom computer.

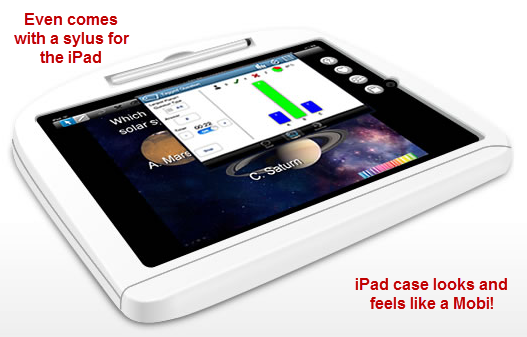
The best feature (OK, one of the best) is that now you can run the Insight 360 application from an iPad 2!   This frees up all existing Mobis or Mobi Views in your classroom to become student Mobis!   As you can see in the image below, they even went as far as to make a case to house the iPad to give it the look and feel of a Mobi!


I just started this week to use my new Insight360 system, so more information and photos to follow, along with opinions from my students on how they like learning from this new system.

The new  Insight360 is a finalist in the 2012 EdTech Digest Awards Program for the Cool Tool Ward!   EdTech Digest Awards 2012

To learn more about the new Insight360 system from eInstruction, you can visit their website.


Analytics Plugin created by - Powered by Womens Sunglasses and Human Services Degree.