Tag Archive for lesson

Common Core in Action Part II

CCinAction2

I recently wrote about the video series I created for Pearson, entitled Common Core in Action.  I wanted to share one more screen shot from the videos and talk a little bit more about what using Hyperstudio can do to make videos more engaging and visually appealing for students.

Here is a screen shot from the video entitled “Common Core In Action: Adding Fractions”.

AddingFractions

The screenshot above is showing the portion of the video where I am adding two fractions with a common denominator of sixths.   The sixths are visually represented by purple one-sixth fraction strips.

I used Hyperstudio to create the stage for my video because I can move objects around the stage during the video.  In this case, I used the stack of one-sixth strips on the bottom of the screen to show two-sixths plus five-sixths as adding a set of 2 purple one-sixth strips and 5 more purple one-sixth strips to obtain 7 of the purple one-sixth strips.

The point in the video where this screenshot is taken, is where I am showing how the improper fraction seven-sixths, can be turned into a mixed number by bringing a red strip to the stage, which is worth one whole.  Lining up the purple one-sixth strips along the edge of the red one-whole strip, I am able to show that 6 of the one-sixth strips are equal in length to the one-whole red strip, leaving me with 1 one-sixth strip left over.  Having the ability to move around the fraction strips during the video makes it easier to explain visually why seven-sixths is the same as one and one-sixth.

Using the fraction strips is important to the Common Core Standards for explaining WHY a common denominator is needed when adding fractions, and not just having the student perform an algorithm by showing them “how” to add fractions.

EquivFractionPlaygroundImage

To give you a better idea of what the fraction strips can do for students when I use them in fraction lesson videos, I created a small video where I move around the fraction strips showing how to visualize equivalent fractions.  You can see that HERE.

In the screen shot above, I have created all of my fraction strips so that they are relative in size to the red one-whole strip.  For example, it takes 2 of the one-half strips to equal the one-whole strip, 3 of the one-third strips, 4 of the one-fourth strips, and 6 of the one-sixth strips.   Another reason I use Hyperstudio, rather than real fraction strips and a document camera to create the videos I teach with, is because I can create any size and color fraction strips I want.

If you would like me to create a lesson for you, please send me details about the manipulatives (like fraction strips) you would like me to use, along with desired colors, and I will design and create a personalized video lesson for you, on demand!


An Intelligent iPad Stylus

I recently wrote about Doceri 2.0,  which comes out today ( July 24, 2012) at noon PST in iTunes stores!  The old version is called Doceri Remote, which was version 1.2.2 but the new version will just be called Doceri and will be version 2.0.

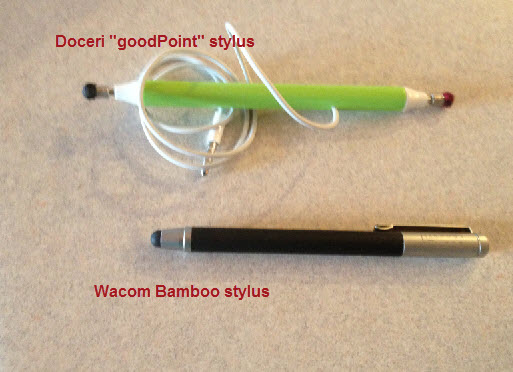
I thought I would follow up with a review of their “goodPoint” Intelligent stylus.  The stylus has a chord which plugs into the headphone jack; this allows it to be controlled in Doceri 2.0.

I normally use the Wacom Bamboo stylus, which I love, but I thought I would give this “Intelligent” stylus a try.

Doceri vs Bamboo

I tried both with Doceri 2.0, and I have to admit the extra features in the goodPoint stylus were really nice to have when creating animations!   The main features I appreciated were the fact that  you can get a very fine point that is consistent, and that it allows you to rest your hand on the screen while writing with it.    The back of the goodPoint is also an eraser.   I would have used it more, but I kept forgetting it was there, since I have never had a stylus with an eraser before.

To get a better feel for how it compared with my Wacom Bamboo stylus, I compared them with 4 of my favorite iPad apps.

Here are some screen shots comparing the two different stylus brands (2 screencasting apps, and  2 note taking apps).  You decide which has the better handwriting – some are close and some are not.  Sorry my handwriting is not great, but some apps do help it along more than others!

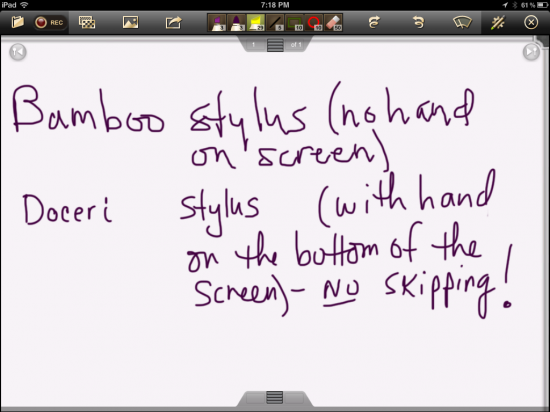
From within the Doceri application on my iPad:

Doceri comparison

Doceri goodPoint stylus wins here!

On the top of the screen, I tried to use the Wacom Bamboo stylus with my hand on the screen, but I could not.  Having to write with my hand not on the screen definitely made my hand writing worse (OK, it is not great anyway, but it was harder to write that way, and not as clear).  With the Doceri “goodPoint” stylus, I was able to rest my hand on the screen while I wrote, which was much more comfortable!  The writing was smoother as well.

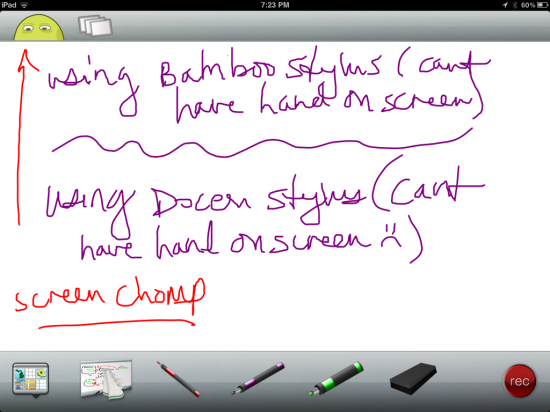
Before I found Doceri 2.0, I was using ScreenChomp as one of my favorite screencasting apps on the iPad.  Here is a comparison of Bamboo stylus and the Doceri stylus using ScreenChomp:

Screen Chomp comparison

Close, but since I can’t rest my hand on the screen with either, I would prefer to use the Bamboo stylus here (only because it does not have a chord).

As you can see the writing is similar using both (maybe a little better with the Doceri stylus?), but in both cases I was not able to rest my hand on the screen and still have the application let me write.   For me, that is a huge deal, as I am much more comfortable writing like I do on paper, with my hand on the surface while I write.

Next I thought I would compare my 2 favorite note-taking applications on the iPad (that allow me to hand write).

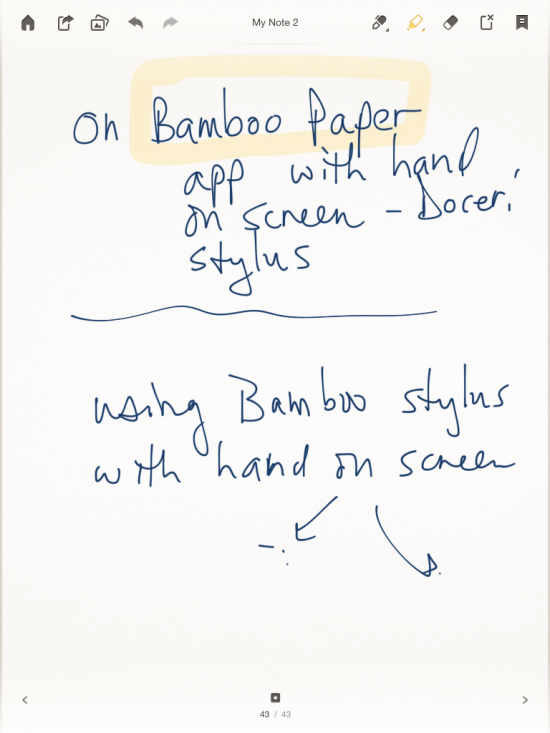
First I tried Bamboo Paper by Wacom:

Bamboo Paper comparison

Handwriting is close, but Doceri wins since I don’t want stray marks on my screen.

The good news was that the application allowed me to rest my hand on the screen while writing with both the Bamboo and the Doceri stylus, but as you can see in the screen shot above, the Wacom Bamboo stylus created extra marks when I did this, while the Doceri “goodPoint” stylus created no extra marks.  The hand writing seemed fairly similar to me, but it was nice not having to worry about marks when I set my hand on the screen with the Doceri stylus.

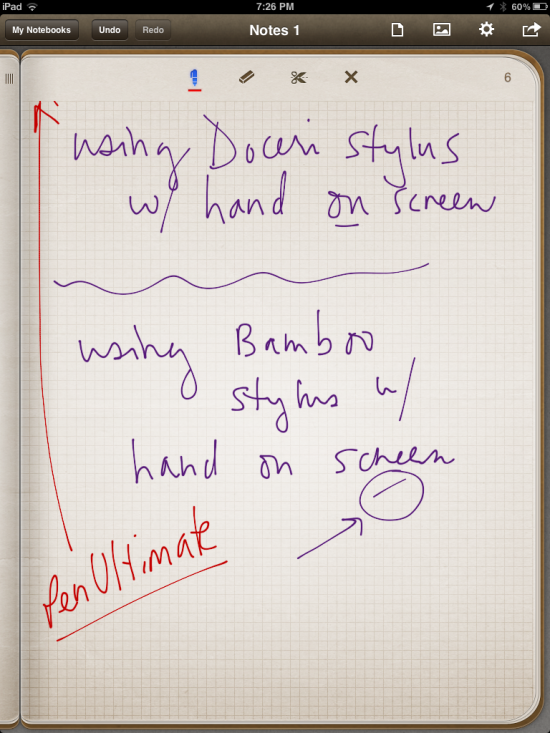
Finally, another note-taking app for the iPad I really like is called PenUltimate.  I thought I would compare with that app as well:

Pen Ultimate comparison

This app allowed me to rest my hand on the screen with both the Bamboo and the Doceri stylus.  However, Doceri stylus wins again, since I don’t want stray marks on my screen.

If you don’t mind the stray marks and some apps not allowing you to rest your hand on the screen, then the Wacom Bamboo stylus is a great choice.   However, given that I definitely prefer to place my hand on the screen and I don’t want any stray marks, then I prefer the Doceri goodPoint Intelligent stylus over the Wacom Bamboo stylus.

*Just a point of clarification: I was told by Doceri that the goodPoint stylus should really not do ANY better or worse than the Wacom (or any other stylus) for stray marks in apps other than Doceri.  The fact that it did for me is probably just a coincidence.  They agreed, though, that when using it in Doceri, the palm rejection is a major difference when using the Doceri stylus!


New “Insight” into Teaching with Technology!

Introduction to the Insight 360 system by eInstruction

I have been using eInstruction’s Mobi, MobiView and CPS Pulse clickers, along with their Workspace software now for several years.   At times, having to open different programs to run the clickers with the Mobi was a bit challenging, and sometimes I found it difficult to set up questions ahead of time.   All that has changed with the Insight360 system.

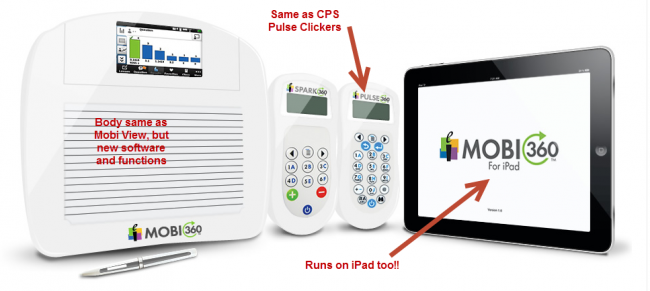
As you can see in the photo, the hardware that has replaced the Mobi and Mobi View looks exactly like the Mobi View (still with the touch screen- yay!), but with new software and menus.   The new software also run the Insight360 clickers and makes it seemless to use them in your classroom!  HUGE improvement!

The old Mobi and Mobi View can still be used with the system as student Mobis, which is great.   The new Insight 360 system makes it very simple to split the screen and allow students with a Mobi (or Mobi View) to write on the virtual whiteboard from their seat, so you don’t have to worry about not being able to use the old hardware!   You can even update your old CPS pulse clickers to the new system easily, rather than having to purchase new clickers!   *I prefer these clickers over other systems I have seen because they work extremely well WITH the Mobi (they are not just stand alone clickers).   From anywhere in the room, I can access live data coming from the clickers (my students) to make immediate decisions about how to change the course of my classroom instruction, and the system works with any software on your computer – like Powerpoint, anything on the internet, or even the Workspace software from the Mobi generation.  So teaching with this system does NOT tie you down to only one application to teach from on your classroom computer.

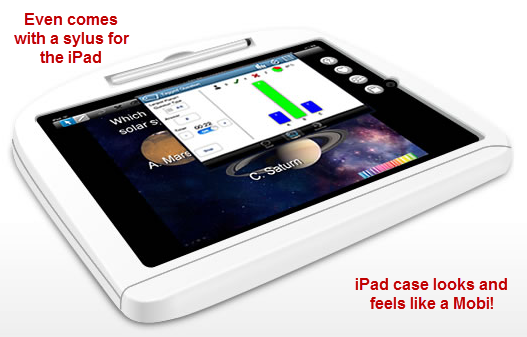
The best feature (OK, one of the best) is that now you can run the Insight 360 application from an iPad 2!   This frees up all existing Mobis or Mobi Views in your classroom to become student Mobis!   As you can see in the image below, they even went as far as to make a case to house the iPad to give it the look and feel of a Mobi!


I just started this week to use my new Insight360 system, so more information and photos to follow, along with opinions from my students on how they like learning from this new system.

The new  Insight360 is a finalist in the 2012 EdTech Digest Awards Program for the Cool Tool Ward!   EdTech Digest Awards 2012

To learn more about the new Insight360 system from eInstruction, you can visit their website.


My Student Hyperstudio Projects

Student Hyperstudio5 Projects

The final project I had my Math For Elementary Teachers do for the course was to create an interactive Hyperstudio Project.


The projects are too large to be viewed well inside my blog, so I have created a website to house them. The website is best viewed using Safari if possible, if not, just ignore the browser warning, as I have used a beta version of Hyperstudio to export them into HTML5 .

I have many of my student’s projects posted on a THIS WEBSITE.    Enjoy!


Creating a Text Embedded Interactive Worksheet with a Livescribe Smartpen

EMBEDDING TEXT BEHIND A LIVESCRIBE PENCAST PDF

Recently I learned how to embed text behind a Livescribe pencast and it has changed everything!

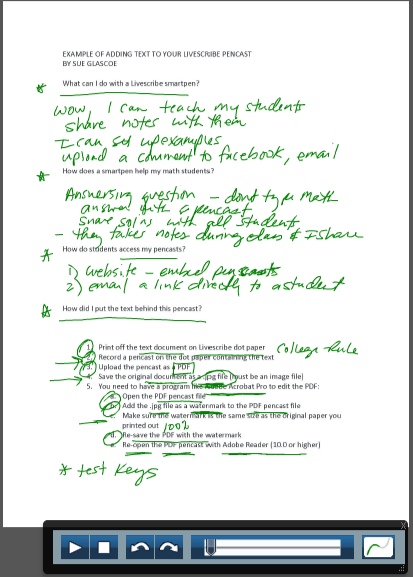
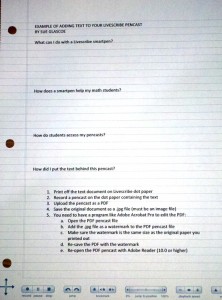
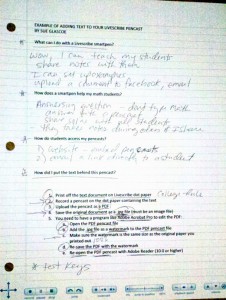
I created a short interactive worksheet to show what can be created with this process.   The following is a screenshot of the text embedded pencast because I cannot embed a PDF file (yet) into a website.   A link to the actual pencast PDF is below the screenshot.

Pencast PDF with text in the background
(you must have Adobe Reader 10.0 or higher to view this interactive PDF)

If that does not work, I put a link on my website for you to click on OUTSIDE of WordPress
(I have some issues with opening PDFs inside WordPress – if anyone can help me to embed
a PDF in WordPress or a website I would really appreciate it!)

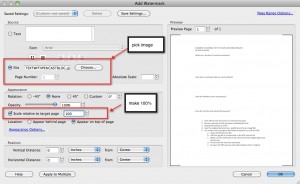
As listed in the pencast, the steps to embed the text in the pencast PDF are as follows:

1.  Print off the text file onto Livescribe dot paper (I used college-ruled dot paper in my printer)

2.  Record a pencast on top of dot paper that has the text printed on it (the text shows you where to write!)

(sorry about the poor photo quality)

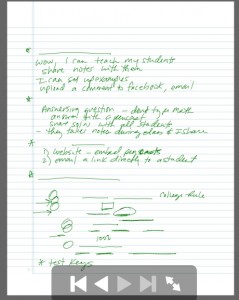
3.  Connect your smartpen and upload your pencast as a PDF (use the “Computer” connector)

As you can see in this screen shot, the pencast looks pretty strange without the text behind it!

4.  Save the original text document as a .jpg (image file) – to do this you must first save it as a PDF and then you can use Adobe Acrobat Pro or the free online utility Zamzar (www.zamzar.com) to save your PDF as a .jpg file

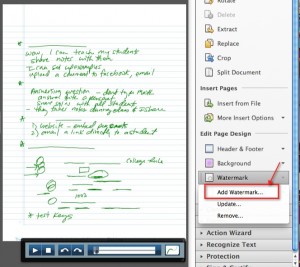
5.  Open the pencast PDF in Adobe Acrobat Pro or PDF Pro (http://epapyrus.com/en/)  so that you can add a watermark to the PDF file

6.  Add your .jpg text file as a watermark to your pencast PDF and re-save the PDF

7.  The new pencast PDF can be viewed by anyone with Adobe Reader 10.0 or higher


Please add comments on this blog if you know of other free ways to save a text document as an image file and also if you know of other (especially FREE) programs that allow the user to edit a PDF.

Please send me the projects you make – I would love to see them!


Screencaptures by TechSmith for the iPad!

While reading through posts on Google+, Facebook and Twitter by my PLN, I came across this valuable new FREE app for the iPad!   I use TechSmith products (Camtasia, Snagit and Jing) all the time on my laptops, but always wanted to have the same functionality for my iPad.  Not only did TechSmith follow through, but they made it FREE!

Opening up the ScreenChomp app, you see a blank whiteboard.

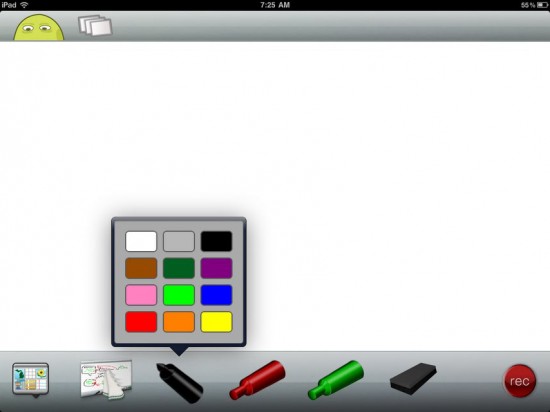
They have given us 12 colors to choose from (but I would like to see a slider for SIZE of the pen at some point in the near future!), an eraser and a record button – yes ScreenChomp will record a video of you writing and speaking at the same time!

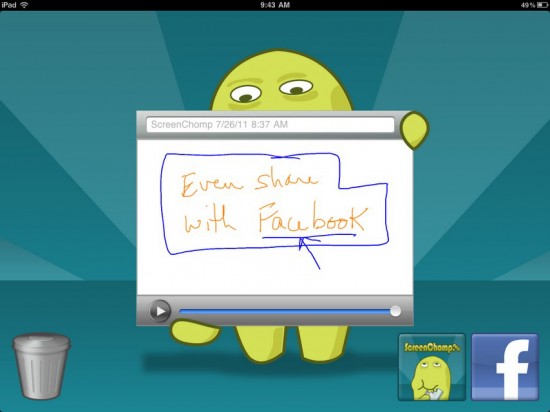
When you save your file you have the option of saving it to the “cloud” by hitting the ScreenChomp.com button or sharing it on Facebook.

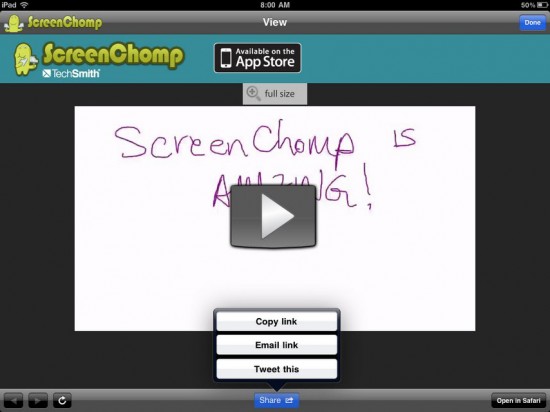
After saving your screencast, you have three options for sharing:   You can copy the link, email it or Tweet it!  Here is a link to the actual video I just made.   I need to find a way to embed the video without having to go through another application. Suggestions?

I think this will be a GREAT way to answer student questions from my iPad!  I just have to create a quick screencast on my iPad and then send it to them.   Can’t wait to try it out!


Creating INTERACTIVE activities with HyperStudio5!

Link to the official Hyperstudio website

In my spare time (ha ha) I have been playing with Roger Wagner’s Hyperstudio 5.   (Luckily Roger Wagner himself has been helping me!!)  What a fun program!    My goal is to create more INTERACTIVE activities and tutorials/videos for my students, without all the work of Flash.   Hyperstudio fits that goal amazingly well!   It is similar to PowerPoint, but far more incredible in my book!

I “finished” my first final draft (I keep “fixing it” so it is forever in draft mode) of an interactive tutorial on introducing combinations and counting, and posted the project on a new area of my website with the button “HyperStudio Projects”.

Before clicking on the link below that will take you to the Hyperstudio stack, you must first make sure you are using either Safari or Internet Explorer, because these are the only browsers that have the Hyperstudio web-brower add-on for now.   To get the browser add-on, go to:  http://www.mackiev.com/support_hs.html , click on the proper computer type, then get the browser add-in for either Safari or Internet Explorer, then you will be able to view and PLAY WITH the activity.

Here is the direct link to my first project: http://www.tech4mathed.com/HyperStudio/IceCream_SG.html

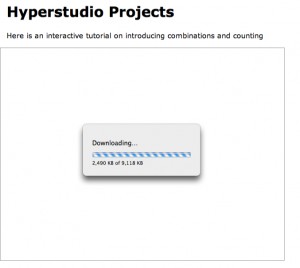
If you have the browser add-on correctly installed you should see the following screen:

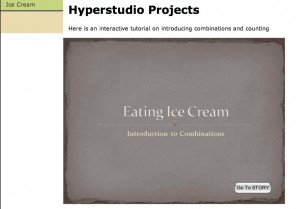
Once the stack is finished loading, the screen should look like:

Now you are ready to click on “go to STORY”.

I created the story like a video, and I narrated every screen, so you can  hear the narration if you click on the button. The audio level needs some work, some of the narration is too quiet and I will need to redo those sections.  The most fun part of it, however, is the INTERACTIVITY that was easy to create!

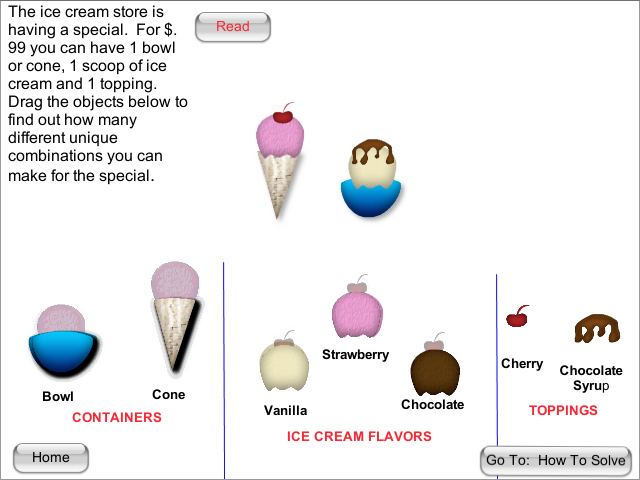
In this activity, I created an Ice Cream Playground, where you can actually move around all the objects on the page to explore and find the answer before viewing the explanation of the solution.  My 14 year old son did all of the artwork for me!   It is wonderful having a live-in artist on hand!

Please give it a try and let me know what I can do to make it more interesting for my students.   I also need to know if you are able to view it on a Mac and on a Windows machine.  Some Windows machines can view it and some cannot, so I am trying to trouble-shoot which versions of Windows have difficulty to help find a fix for that.

I am excited to make more projects and play with Hyperstudio!


Intermediate Algebra online modules

online module

This year I have started teaching my Intermediate Algebra courses as hybrid, with 4 days face-to-face and 1 day “online”.

For the online day, I create a module for the students to view before attempting the homework and taking a quiz that day.  I try to make the online modules very similar to what I would have taught that day in class.   I have tried a variety of technologies to get my lessons across visually, with sound, and also animation.   I create my own Flash animations, use my Livescribe pen to work out problems which I record and place on the module webpage, and I use Jing to crop screen shots from the textbook or homework assignments.   In the following module I opened up with an avatar using Voki.

View my Intermediate Algebra online module


Analytics Plugin created by - Powered by Womens Sunglasses and Human Services Degree.