I recently wrote about the video series I created for Pearson, entitled Common Core in Action. I wanted to share one more screen shot from the videos and talk a little bit more about what using Hyperstudio can do to make videos more engaging and visually appealing for students.
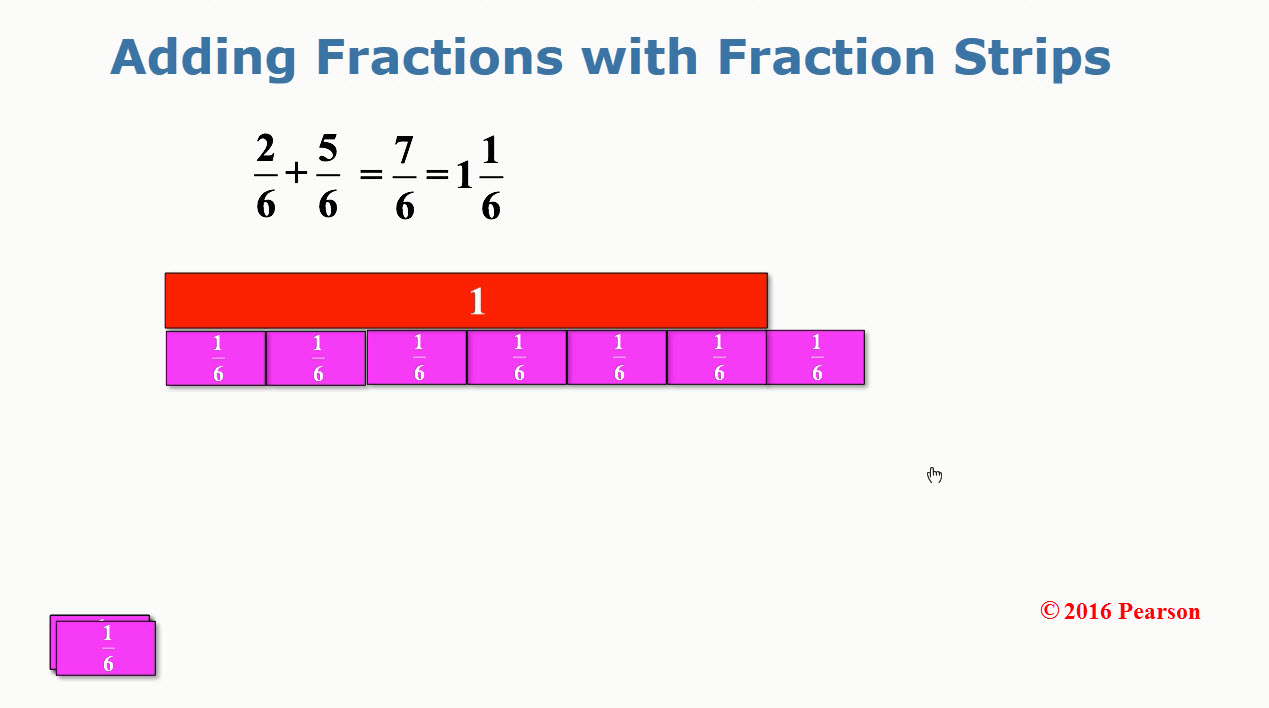
Here is a screen shot from the video entitled “Common Core In Action: Adding Fractions”.
The screenshot above is showing the portion of the video where I am adding two fractions with a common denominator of sixths. The sixths are visually represented by purple one-sixth fraction strips.
I used Hyperstudio to create the stage for my video because I can move objects around the stage during the video. In this case, I used the stack of one-sixth strips on the bottom of the screen to show two-sixths plus five-sixths as adding a set of 2 purple one-sixth strips and 5 more purple one-sixth strips to obtain 7 of the purple one-sixth strips.
The point in the video where this screenshot is taken, is where I am showing how the improper fraction seven-sixths, can be turned into a mixed number by bringing a red strip to the stage, which is worth one whole. Lining up the purple one-sixth strips along the edge of the red one-whole strip, I am able to show that 6 of the one-sixth strips are equal in length to the one-whole red strip, leaving me with 1 one-sixth strip left over. Having the ability to move around the fraction strips during the video makes it easier to explain visually why seven-sixths is the same as one and one-sixth.
Using the fraction strips is important to the Common Core Standards for explaining WHY a common denominator is needed when adding fractions, and not just having the student perform an algorithm by showing them “how” to add fractions.
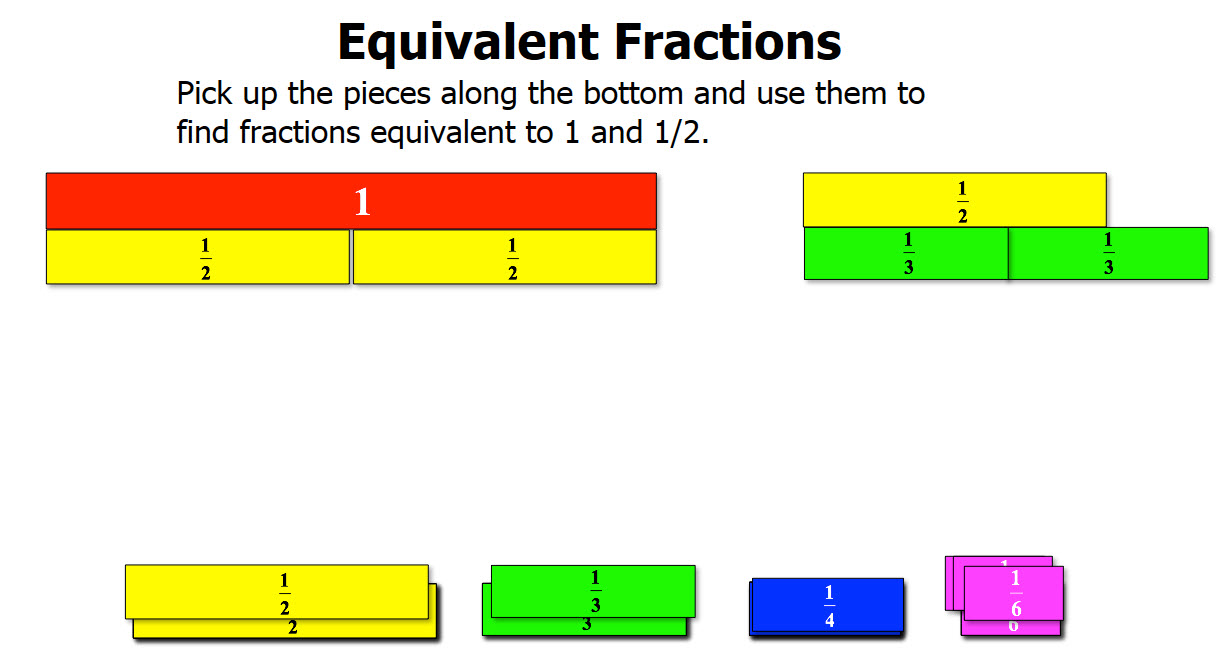
To give you a better idea of what the fraction strips can do for students when I use them in fraction lesson videos, I created a small video where I move around the fraction strips showing how to visualize equivalent fractions. You can see that HERE.
In the screen shot above, I have created all of my fraction strips so that they are relative in size to the red one-whole strip. For example, it takes 2 of the one-half strips to equal the one-whole strip, 3 of the one-third strips, 4 of the one-fourth strips, and 6 of the one-sixth strips. Another reason I use Hyperstudio, rather than real fraction strips and a document camera to create the videos I teach with, is because I can create any size and color fraction strips I want.
If you would like me to create a lesson for you, please send me details about the manipulatives (like fraction strips) you would like me to use, along with desired colors, and I will design and create a personalized video lesson for you, on demand!
I apologize for not writing more posts this semester, but I have been swamped with work and play 🙂
I just received the new wi-fi Livescribe smartpen called SKY today and I promise to write a blog post soon about the features and how I plan on using it. Wi-fi opens the potential of the smartpen to be even smarter!! I can’t wait!
I have been using Doceri 2.0 along with the Mobi 360 w/ clickers in my math classes and plan on updating all of you on how well that is going (it is going REALLY well, by the way) and how I have used them with my students.
I had given up on graphing calculators for a while, since I really wanted the students to engage more in class and use clickers. I found the perfect balance recently!
The calculators by themselves are pretty amazing, but there is a learning curve that made it too much for me to want to use them with my students. However, I was recently introduced to the TI Navigator system, which turns this amazing calculator into an even more amazing clicker (student response system)!
That is worth trying out for me! I have a loaner set I will use this Fall with my Algebra classes.
It is a bit bulky, but the case charges the calculators and allows me to send data to all of the calculators at once (if I don’t have the yellow Navigator caps on. The case will not close with the Navigator caps on).
The calculator has a color screen, along with a mouse track pad and a full keyboard on the bottom. Lots of handy math symbols are easy to get to directly from the keys as well. (The calculator shown does NOT have the yellow Navigator cap on.) But let’s get down to how to use this with the Navigator system!
I downloaded theTI-Nspire Navigator teacher software from their website and then set up a sample class with 5 students. As you can see below, I named them Student 1, Student 2, Student 3, Student 4 and Student 5 (I am so creative!). You will create usernames for each student and then either create a password for them, or let them create their own. You can also upload a CSV file into the system to automatically populate your class!
I am using the TI wireless network access point (it looks like a Verizon MiFi) to connect all the calculators to my computer, but you only have to set that up one time. Once you “Begin Class” (top right of the image above), then the students can log into ANY of the calculators (they don’t have to have the same one each time!) and make sure they are connected to the network you created. It will tell them they are logged in, and they will show up on the teacher’s computer that way as well.
There are 2 main features I plan to use the calculators with the Navigator system for: 1. grabbing screen shots of all (or some) student calculators, and 2: polling the students – asking them a question like using a clicker, but the question shows up on their calculator with the tools they need!
CALCULATOR SCREEN SHOTS
At any time during the class, I can grab live screen shots of all student calculators, or just one student’s calculator. I think this will be very handy to “check in” on student progress to see where they are in solving the problem given or to see if they are even paying attention!
I can even “call on a student” to share their screen to see how they solved a problem (by making them the presenter).
POLLING STUDENTS
The 2nd, and main use, of the Navigator system with the TI-nspire calculators for me is using them to “poll students” during class.
I was really amazed to see the variety of questions I can create and send to the students’ calculators! Other clickers (student response systems) I have tried have a few of these options, but this is truly an incredible list for math!
In the above screen I chose the “Drop points” type of question, and typed in my question (see below).
I have a lot of math templates I can choose from as well, if I need to quickly type in a fraction or other math symbol.
I created a question for the students to drop a point on the graph where the ordered pair (3,-4) is located. That would not be possible on any other clicker I know of! To send the question to the calculators I just hit the “Start Poll” button at the top of the screen. I can create questions ahead of time, or real time during class, to poll the students with.
The photo above shows what was sent to the calculators. As you can see they have a split screen with the question and a set of axes to plot their point on. The students use the track pad on their calculator to move the point to the desired location.
Once they have answered the question, they hit the “Doc” key and choose “submit” (they are submitting their document to my computer). The teacher’s computer then shows that student has responded.
The teacher can hit “Stop Poll” at any time to stop the students from being able to answer the question any longer, and gather all the data. The data is stored on the computer and the teacher can access it immediately, or look through individual student responses outside of class.
The system allows the teacher to set up questions where students can show steps, and the teacher can show multiple pieces of information in the question, like the question and a graph as seen below.
When the students submit their solution, the work is shown as you can see below (different question I was playing with).
The teacher can also look at the solutions of the class as a whole (another different question):
The question is always shown with the solutions given by the students., but this view is nice for the students to be able to see (anonymously) what the different answers looked like from the class.
If the teacher creates the question with a “correct answer”, then the solutions the students submit will be scored as correct or not (the teacher can even give more than one correct answer!).
I realize this is a lot of information at once, but I was hoping that some of you would be as excited as I am about using the TI-nspire CX with the TI Navigator system as a student response system (clickers) in class!
I will write more after I start using it in my Algebra classes and let you know how it is going.
I recently wrote about Doceri 2.0, which comes out today ( July 24, 2012) at noon PST in iTunes stores! The old version is called Doceri Remote, which was version 1.2.2 but the new version will just be called Doceri and will be version 2.0.
I thought I would follow up with a review of their “goodPoint” Intelligent stylus. The stylus has a chord which plugs into the headphone jack; this allows it to be controlled in Doceri 2.0.
I normally use the Wacom Bamboo stylus, which I love, but I thought I would give this “Intelligent” stylus a try.
I tried both with Doceri 2.0, and I have to admit the extra features in the goodPoint stylus were really nice to have when creating animations! The main features I appreciated were the fact that you can get a very fine point that is consistent, and that it allows you to rest your hand on the screen while writing with it. The back of the goodPoint is also an eraser. I would have used it more, but I kept forgetting it was there, since I have never had a stylus with an eraser before.
To get a better feel for how it compared with my Wacom Bamboo stylus, I compared them with 4 of my favorite iPad apps.
Here are some screen shots comparing the two different stylus brands (2 screencasting apps, and 2 note taking apps). You decide which has the better handwriting – some are close and some are not. Sorry my handwriting is not great, but some apps do help it along more than others!
From within the Doceri application on my iPad:
Doceri goodPoint stylus wins here!
On the top of the screen, I tried to use the Wacom Bamboo stylus with my hand on the screen, but I could not. Having to write with my hand not on the screen definitely made my hand writing worse (OK, it is not great anyway, but it was harder to write that way, and not as clear). With the Doceri “goodPoint” stylus, I was able to rest my hand on the screen while I wrote, which was much more comfortable! The writing was smoother as well.
Before I found Doceri 2.0, I was using ScreenChomp as one of my favorite screencasting apps on the iPad. Here is a comparison of Bamboo stylus and the Doceri stylus using ScreenChomp:
Close, but since I can’t rest my hand on the screen with either, I would prefer to use the Bamboo stylus here (only because it does not have a chord).
As you can see the writing is similar using both (maybe a little better with the Doceri stylus?), but in both cases I was not able to rest my hand on the screen and still have the application let me write. For me, that is a huge deal, as I am much more comfortable writing like I do on paper, with my hand on the surface while I write.
Next I thought I would compare my 2 favorite note-taking applications on the iPad (that allow me to hand write).
Handwriting is close, but Doceri wins since I don’t want stray marks on my screen.
The good news was that the application allowed me to rest my hand on the screen while writing with both the Bamboo and the Doceri stylus, but as you can see in the screen shot above, the Wacom Bamboo stylus created extra marks when I did this, while the Doceri “goodPoint” stylus created no extra marks. The hand writing seemed fairly similar to me, but it was nice not having to worry about marks when I set my hand on the screen with the Doceri stylus.
Finally, another note-taking app for the iPad I really like is called PenUltimate. I thought I would compare with that app as well:
This app allowed me to rest my hand on the screen with both the Bamboo and the Doceri stylus. However, Doceri stylus wins again, since I don’t want stray marks on my screen.
If you don’t mind the stray marks and some apps not allowing you to rest your hand on the screen, then the Wacom Bamboo stylus is a great choice. However, given that I definitely prefer to place my hand on the screen and I don’t want any stray marks, then I prefer the Doceri goodPoint Intelligent stylus over the Wacom Bamboo stylus.
*Just a point of clarification: I was told by Doceri that the goodPoint stylus should really not do ANY better or worse than the Wacom (or any other stylus) for stray marks in apps other than Doceri. The fact that it did for me is probably just a coincidence. They agreed, though, that when using it in Doceri, the palm rejection is a major difference when using the Doceri stylus!
I got back from ISTE, overwhelmed with all the new and amazing tools and apps I learned about! Luckily the great folks at Doceri let me play with their beta 2.0 version (which should hit iTunes stores soon) and that made for an easy decision for me to start right there.
I get to use the iPad classroom (25 student iPads, 1 teacher iPad, and an Apple TV!!) to teach Intermediate Algebra in the Fall, so my focus at ISTE was to find iPad apps that allow students to create, not just to consume. I hit the jackpot with the new version of Doceri!! Not only can I create lessons, but the students will be able to create animations and videos as well, right from their iPads.
The new version of Doceri (2.0) should hit the iTunes app store soon, and it is a HUGE update!
The new features I am so excited about are 1) it allows you to work directly from the iPad (without needing to connect to a computer), and 2) it now records your pen strokes allowing you to easily create animations and videos directly from the iPad! INCREDIBLE! You can even edit your animations and upload your videos to YouTube!
OK, before I get too far ahead of myself (I am just so excited!), here is the new opening screen on the iPad:
(By the way, I did get permission from Doceri to blog about the new version before it hits the iTunes store!)
**UPDATE! Doceri 2.0 will be in iTunes stores July 24, 2012!!!
As you can see, Doceri 2.0 can now be used from the iPad alone, and even use Airplay if you are presenting (or just use the iPad at home to create a lesson!!!).
Starting a new project gives you a blank screen, which you can change to any color, use one of their backgrounds, or create your own. They have included many helpful math backgrounds, along with maps, as well as colors and textures.
After you choose your background, you can start writing on the screen. What you see at the top of the image below is the new RECORDING menu!!! It records your writing strokes. You can go back and edit them, speed them up, or slow them down. You can even add stops and new slides to your project. The record button on the top left allows you to record voice as well (while writing, or narrate even after you are done writing).
After recording a video, you have several options for exporting (on the right) to Facebook, YouTube, email, and to your images folder on the iPad.
You can also open your recordings on your iPad with any app loaded that will play a .mov file, including Dropbox and Evernote, so you can access your recordings from any device! (I also have TechSmith’s Fuse app installed on my iPad, so it found that app and listed it as well.)
The folks at Doceri created quite a few sample projects to help give ideas on how this new product can be used. Here is a screenshot of one of their videos (of course I chose math, but there are many other types as well):
*Once Doceri 2.0 hits the iTunes stores, you can pay for the ability to remove the Doceri watermark, and even add your own watermark.
Like the original Doceri Remote app, Doceri 2.0 can connect to your computer to share screens, but now there is a MUCH easier way to connect:
If you have an iPad2, just point the camera at the QR code and you are automatically connected! I tried it and it worked amazingly well. Once you are connected to your computer, you can use your animations and videos to present a lesson to the class, or create one while you are presenting!
**I am using the term “animation” for those projects that do not contain sound. All writing into the application is recorded and can be shown as animated or as still shots. These can only be played from within Doceri. Once you add sound, then a .mov file is created, so I am using the term “video” for the animations with sound added.
Here is the “official” list of updates for Doceri 2.0 (from Doceri):
What’s new in Doceri 2.0
You can now prepare Doceri Projects on the iPad without being connected to a Doceri Desktop AND you can present without a Doceri Desktop via Airplay. Audio recording has been added to create high quality screencast videos based on Doceri projects. In addition, more sophisticated drawing and authoring tools have been added, as well visual file management, improved placement of project timeline controls for easier presentation, and improved screen update time for remote desktop control.
Screencasting with Doceri
Create a live screencast as you present, or create, edit and perfect your project in advance and add an audio voice over later
Choose to save audio or delete and re-record without impacting your Doceri project
Videos may be shared via YouTube, Facebook or email and/or saved to the Camera Roll and any app that responds to video
New Drawing and Authoring Tools
New line tools (with snapping), geometric shapes (rectangle, ellipse) arrow tool and a new pen tool with realistic ink flow
Easy access to six user-defined favorites from the available drawing tools
Place photos from Camera Roll, Photo Stream or another application at any point in your project
The new lasso tool allows you to cut, copy, move and paste drawing objects
Choose between patterns, colors or create custom backgrounds on any slide in your project
Direct Controls for Keynote and Powerpoint
Launch a PowerPoint or Keynote presentation and use Doceri’s one-touch controls to advance your slides
Annotate over Keynote or Powerpoint (or anything shown on your desktop), creating a multipage Doceri project while keeping your original presentation file intact
Completely Revamped File Management
Doceri files can now be stored on the iPad Duplicate, merge projects, and transfer to and from your desktop
Combine, resize and share screencasts to Facebook, YouTube, Camera Roll or email with a simple drag and drop
Full implementation of cross application file sharing allowing “open in” function to copy files in and out of Doceri
When I was at ISTE this past June, I had the good fortune to visit the Explorelearning booth. I have seen some of their online math and science interactive simulations (called Gizmos) on their website before, but this time I really wanted to dig deeper.
I obtained a teacher subscription to their full site where I can create classes, and then add the Gizmos I want to each class. The Gizmos even come with lesson plans and teacher created activities! You can add your own classroom ideas to a Gizmo as well.
I set up my first class: Math For Elementary Teachers. I then started adding some Gizmos for my students to view.
On the Explorelearning website the Gizmos are sorted by grade level and topic. The first one I chose was an interactive lesson on factoring numbers.
A student can start with any number on the board they want, and then start factoring it by dragging the circles that are factors to the board. There are great “how-to” videos that go with every Gizmo, in case the student (or the teacher) does not understand how to use the simulation.
When a student has run through the simulation as many times as they want, they can take the assessment at the end. Some questions are visual, based on the Gizmo (like the example below), and some are numerical to see if they can go beyond using the Gizmo.
I will have my pre-service students evaluating and choosing their favorite Gizmos for different areas of Elementary mathematics this Fall semester. I can’t wait to see their reactions to these amazing math and science simulations!
I have been teaching the Math For Elementary Teachers course for about 8 years now. I love using manipulatives to help the students better understand WHY the “rules” work. When the class was over, however, they didn’t have anything to look back on to see the manipulatives we used in “action”. There were drawings and explanations in the textbook, but nothing that would simulate what we had done in class. So, several years ago I decided to learn Flash so I could create my own animated tutorials to help my students remember the REASON behind the math, and not just the rules!
I learned Dreamweaver at the same time so that I could create a website to house the animations. I decided to not only house the animations in their respective courses/chapters, but I decided that it would be beneficial to others if I created a separate website as well that housed the animations by topic.
Check out some of my arithmetic animations at: http://www.mc.maricopa.edu/~glascoe/arithmetic/arithmeticindex.htm I am still in the process of creating many more. Eventually I will also create some that are interactive (where the students can move the objects around). I have so much technology on my plate right now that I have to keep moving back and forth between projects! I find it better to have too many passions in life, rather than too few!