Archive for HyperStudio

Common Core in Action Part II

CCinAction2

I recently wrote about the video series I created for Pearson, entitled Common Core in Action.  I wanted to share one more screen shot from the videos and talk a little bit more about what using Hyperstudio can do to make videos more engaging and visually appealing for students.

Here is a screen shot from the video entitled “Common Core In Action: Adding Fractions”.

AddingFractions

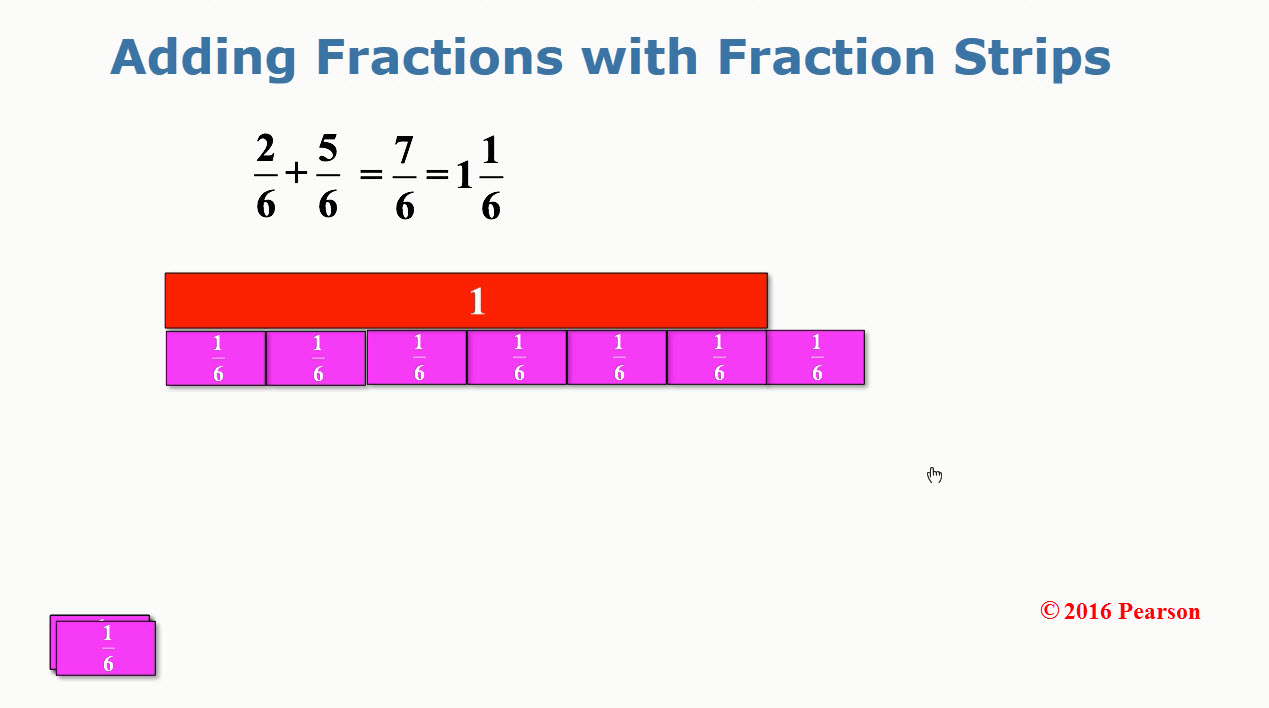
The screenshot above is showing the portion of the video where I am adding two fractions with a common denominator of sixths.   The sixths are visually represented by purple one-sixth fraction strips.

I used Hyperstudio to create the stage for my video because I can move objects around the stage during the video.  In this case, I used the stack of one-sixth strips on the bottom of the screen to show two-sixths plus five-sixths as adding a set of 2 purple one-sixth strips and 5 more purple one-sixth strips to obtain 7 of the purple one-sixth strips.

The point in the video where this screenshot is taken, is where I am showing how the improper fraction seven-sixths, can be turned into a mixed number by bringing a red strip to the stage, which is worth one whole.  Lining up the purple one-sixth strips along the edge of the red one-whole strip, I am able to show that 6 of the one-sixth strips are equal in length to the one-whole red strip, leaving me with 1 one-sixth strip left over.  Having the ability to move around the fraction strips during the video makes it easier to explain visually why seven-sixths is the same as one and one-sixth.

Using the fraction strips is important to the Common Core Standards for explaining WHY a common denominator is needed when adding fractions, and not just having the student perform an algorithm by showing them “how” to add fractions.

EquivFractionPlaygroundImage

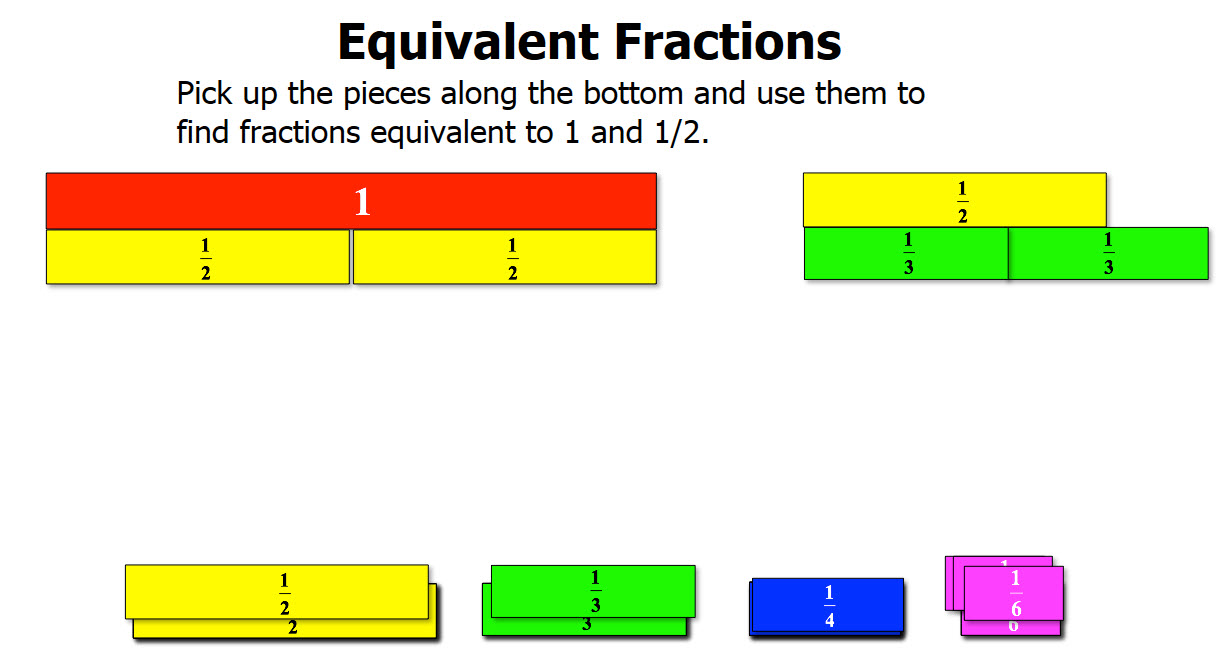
To give you a better idea of what the fraction strips can do for students when I use them in fraction lesson videos, I created a small video where I move around the fraction strips showing how to visualize equivalent fractions.  You can see that HERE.

In the screen shot above, I have created all of my fraction strips so that they are relative in size to the red one-whole strip.  For example, it takes 2 of the one-half strips to equal the one-whole strip, 3 of the one-third strips, 4 of the one-fourth strips, and 6 of the one-sixth strips.   Another reason I use Hyperstudio, rather than real fraction strips and a document camera to create the videos I teach with, is because I can create any size and color fraction strips I want.

If you would like me to create a lesson for you, please send me details about the manipulatives (like fraction strips) you would like me to use, along with desired colors, and I will design and create a personalized video lesson for you, on demand!


Creating More Engaging Videos

I wanted to share a blog post I wrote for my new business, On Demand Curriculum (www.ondemandcurriculum.com).   Normally, I don’t plan on posting the same content on both sites, but this one seemed appropriate here, since I am talking about the technology I used to create the Common Core in Action videos.

CCinAction

I recently finished designing and creating a set of professional videos for Pearson Higher Education called “Common Core In Action”.   It was such a fun project!  The videos are going to be used with math content texts for college students studying to be K-8 teachers. This particular set of videos shows how to teach some of the topics in elementary mathematics, to align with the Common Core Standards.

These videos would be a great resource for parents trying to understand their child’s homework, which could utilize many of these methods. Therefore, I am working with Pearson to try to get permission to set up a site where parents could view these valuable resources. Stay tuned!

I was given permission by Pearson to show a couple of screenshots from the videos.  I will talk about each screenshot in a separate blog post. The first video screenshot I want to show you is from a video entitled “Common Core in Action: Addition Algorithms”.

AdditionAlgorithm

To align to the Common Core State Standards when teaching addition, teachers often have the students use Place Value Disks. In this video I created a set of place value disks, where white disks are worth 1 (one) unit, and red disks are worth 10 (ten) units, to match the actual physical items elementary schools are using.   I also included 5-frames and 10-frames to help teach addition involving regrouping, which used to be called “carrying” when I was in elementary school.

I used Hyperstudio to design and build the background to my video because I wanted to be able to interact with the place value disks during the video, as I taught the lesson on adding whole numbers using place value.

In the screenshot of the video, the bottom row is comprised of the movable objects:

MovablePlaceValueDisks

I have created multiple copies of each object, sitting on top of one another.  During the video I “pick up” place value disks or 5-and 10-frames, as needed, and move them onto the place value board.   The eraser on the side of the screen (see the original screen shot) is used when I create subtraction videos, so that I am able to “erase” objects I am removing, or subtracting.

As I talk through the process of adding 28 and 34 in the video using place value disks, I actually move the disks into the appropriate columns in the place value chart shown.

ButtonToShowSum

The screen shot shows the point in the video where I have 2 ten disks plus 3 ten disks. I also have 8 one disks plus 4 one disks, but in this screenshot I have already regrouped 10 of the one disks to create a set of 10 ones inside of a 10-frame.  This left me with one 10-frame of one disks and 2 one disks left over.   The next step in the video would show me trading the 10-frame for 1 ten disk, and moving the ten disk into the “Tens” column.  This allows me to explain in arithmetic where the “carried 1” comes from.

When I complete the process, and have the final tens and ones disks in the place value chart, I relate the place value disks to the final numeric representation of the sum by hitting the button on the screen labeled “Sum”. The screen will then show the number 62 (which is later in the video than this screen shot), where the digit 6 represents the 6 red ten disks which will be on the screen and the digit 2 represents the 2 white one disks that will be left on the screen.

If you would like me to create a video showing how to use classroom manipulatives to teach a topic in your curriculum, please contact me at sue@ondemandcurriculum.com, and I would love to work with you!

To see the original blog post go here:  http://www.ondemandcurriculum.com/common-core-in-action-part-i/


Using Hyperstudio To Create Videos

HyperstudioLogo2

I recently finished creating a set of twenty professional videos related to the Common Core for Pearson Higher Education’s textbook: A Problem Solving Approach to Mathematics for Elementary School Teachers 12/E by Billstein, Libeskind and Lott.   The video series is called Common Core In Action.

CommonCoreWriteUp2
Screenshot taken from http://www.pearsonhighered.com/billstein-12e-info/features.html

Yup, I am the “experienced faculty shedding light on what the CCSS really means for the classroom and for teachers”.

I really enjoyed this latest video project for several reasons:

  1. This was one of the first times I was given the freedom to use any platform I wished to use to create the videos.  I chose Hyperstudio 5.0 because I could move objects around the screen during the videos, which is very important when teaching how to use manipulatives for the Common Core.
  2. I was not required to create videos according to a textbook author’s wording and style. (These are the types of videos I have mostly created for textbook companies) The Common Core videos were to go with a textbook, but they were not section videos; they were strictly videos to show how the Common Core would have teachers approach particular topics from the textbook.
  3. I got to learn more about the Common Core, and was given a consultant to work with me to make sure the videos were true to representing how the new standards approach the particular areas the videos were covering.

I am trying to acquire permission to show one of the Common Core in Action videos, but since Pearson Higher Education owns all the work I have done for this project, I cannot show anything without their permission.  However, I did want to show you how much more interesting a video can be with interactives, so I created this quick (very quick!) video using Hyperstudio 5.0 and Camtasia Studio to show how you could teach equivalent fractions: Why use Hyperstudio for Videos .

If you would like me to create a video tutorial for you, you can go to my new website at www.ondemandcurriculum.com and contact me.


On Demand Curriculum – My Latest Adventure

Blog Post Header On Demand Curriculum

I have been very busy these past few years trying to build up my contract business with textbook companies.  I have created videos, PowerPoints, and other types of lessons for several large companies.

I was teaching full time and doing these contract jobs, trying to build up my business enough to retire from teaching in the classroom….well, that time finally came.   I retired in May 2015 from teaching at Mesa Community College, and have spent the past few weeks building a new business website so I will be able to share my experience with students, teachers, parents, home school businesses, along with other curriculum creation companies.

I am starting On Demand Curriculum by building up the first area, On Demand Math.  My goal is to make personalized math lessons and tutorials for students, based on their learning style, on demand.   In my experience, students who asked me a question during office hours tended to forget what they learned more quickly than students who asked me a question through email and receive a tutorial that I built just for them that they can watch as many times as they need to.  I want to take that concept and expand it so that more students across the globe can receive help, based on their individual needs.

I also realize that there are many parents out there struggling to help their child with their math homework.  I want to be there for them as well.   A quick tutorial, based on the question they are trying to help their child with, might make a real difference in the child starting to enjoy math (and the parents).

Please help me spread the word that I am now available to help everyone succeed in all levels of math!

You can follow On Demand Curriculum on the following social media sites:

Twitter as @OnDemandMath
Pinterest as OnDemandMath
Instagram as @OnDemandCurriculum
Facebook as On Demand Curriculum

Find out more information at www.ondemandcurriculum.com


My Student Hyperstudio Projects

Student Hyperstudio5 Projects

The final project I had my Math For Elementary Teachers do for the course was to create an interactive Hyperstudio Project.


The projects are too large to be viewed well inside my blog, so I have created a website to house them. The website is best viewed using Safari if possible, if not, just ignore the browser warning, as I have used a beta version of Hyperstudio to export them into HTML5 .

I have many of my student’s projects posted on a THIS WEBSITE.    Enjoy!


Summer Projects for Visual and Interactive Math

Visual Interactive Learning
I have been sitting here staring at my computer for the past week since I got back from an amazing time with a room full of extremely innovative teachers in San Francisco as part of the Livescribe Educational Advisory Board.

I keep staring at it not being able to decide where to start!  I have so many new ideas that I want to implement for the Fall, and now I have even more resourceful people to guide me when I get stuck!

Some of the big ones on my list I have already started working with, but I want to dig deeper and create projects for my students to interact with, and also projects for them to create:

Hyperstudio5 (Roger Wagner will be at ISTE this summer, so that will be fun!)
GeoGebra
Camtasia
Livescribe (new cool stuff coming next week!!)

The newest application I want to learn:

I have been playing with WolframAlpha for the past year, but I recently purchased Mathematica and I am excited to see what I can create with it! My goal is to create visual and interactive materials for Algebra and Geometry.    I will post as soon as I start building!  I am still watching the video tutorials for now.   I want to look further into the following links as well:

Wolfram Research STEM Initiative

Wolfram Faculty Program

Lastly, I NEED to learn Photoshop.   My oldest son currently creates all of my artwork for my projects, but in a few years he will be off to college and won’t be around to help me!

Hopefully between spending time with my family and attending ISTE and HI-TEC this summer, I will be able to dig deeper and create some projects for next Fall using some of these great interactive applications!


Creating INTERACTIVE activities with HyperStudio5!

Link to the official Hyperstudio website

In my spare time (ha ha) I have been playing with Roger Wagner’s Hyperstudio 5.   (Luckily Roger Wagner himself has been helping me!!)  What a fun program!    My goal is to create more INTERACTIVE activities and tutorials/videos for my students, without all the work of Flash.   Hyperstudio fits that goal amazingly well!   It is similar to PowerPoint, but far more incredible in my book!

I “finished” my first final draft (I keep “fixing it” so it is forever in draft mode) of an interactive tutorial on introducing combinations and counting, and posted the project on a new area of my website with the button “HyperStudio Projects”.

Before clicking on the link below that will take you to the Hyperstudio stack, you must first make sure you are using either Safari or Internet Explorer, because these are the only browsers that have the Hyperstudio web-brower add-on for now.   To get the browser add-on, go to:  http://www.mackiev.com/support_hs.html , click on the proper computer type, then get the browser add-in for either Safari or Internet Explorer, then you will be able to view and PLAY WITH the activity.

Here is the direct link to my first project: http://www.tech4mathed.com/HyperStudio/IceCream_SG.html

If you have the browser add-on correctly installed you should see the following screen:

Once the stack is finished loading, the screen should look like:

Now you are ready to click on “go to STORY”.

I created the story like a video, and I narrated every screen, so you can  hear the narration if you click on the button. The audio level needs some work, some of the narration is too quiet and I will need to redo those sections.  The most fun part of it, however, is the INTERACTIVITY that was easy to create!

In this activity, I created an Ice Cream Playground, where you can actually move around all the objects on the page to explore and find the answer before viewing the explanation of the solution.  My 14 year old son did all of the artwork for me!   It is wonderful having a live-in artist on hand!

Please give it a try and let me know what I can do to make it more interesting for my students.   I also need to know if you are able to view it on a Mac and on a Windows machine.  Some Windows machines can view it and some cannot, so I am trying to trouble-shoot which versions of Windows have difficulty to help find a fix for that.

I am excited to make more projects and play with Hyperstudio!


My Next Adventure in Teaching

In just a couple weeks I will be down in Tucson, AZ giving a hands-on workshop to teachers and administrators.  They will have full versions of software in a computer lab to play with!

A representative from the AZ Department of Education emailed me and asked me if I would give a workshop this summer on using technology to teach math, and I jumped at the chance!

I, however, did not write up the introduction to my workshop, as you can see below:

I am actually teaching more than the Livescribe Pulse smartpen in my 3 1/2 hours.   I am also going to focus on Animationish (FableVision) and Workspace (eInstruction), along with showing Jing and Google apps.    I hope to have time to share a little about Hyperstudio5 as well!

Here is a link to the conference details:

Arizona Career and Technical Education Conference 2010

Hopefully I will see some of you there!


My Activities at ISTE 2010 in Denver

Link to the actual Hyperstudio Stack in HTML5

I had a great time at ISTE!  This is the first time I have ever been to a conference and stayed in the vendor area the entire time!

I worked with several companies while I was there.   Every day I spent some time in the eInstruction booth showing folks how I use the Mobi, CPS Pulse student response clickers, ExamView and Workspace in my own classes.   That was very exciting!  I was so busy that I didn’t get any photos of their booth!

I also presented with Jim Marggraff, CEO and founder of the Livescribe Pulse smartpen at a breakfast on Tuesday morning.   It was amazing to meet the man who invented the Leap Pad and the Livescribe Pulse smartpen!  I presented the next day at their poster session as well.

I spent a lot of time in the FableVision Learning booth as well, with my friends Peter and Paul Reynolds and the FableVision Learning staff!   I finally got to meet Peggy Healy Sterns, who created Stationary Studio and The Graph Club (Tom Snyder Productions).  She is currently working on a new project called fab@school with FableVision and Mackiev Software (and other great folks).  Photos and more information about this project if you click on the photo above!

You can see some photos of my adventure on the link below:  It will take you to my Hyperstudio 5 stack on the web.    If you are using a Mac, you need to use Safari, and on a PC, you need to use Internet Explorer (there is a plug-in for Hyperstudio for Safari and Internet Explorer).  I had fun making it!  Be sure to click on the pictures!  Some will take you to other websites and some open videos!  Pretty neat software created by my great friend Roger Wagner (Mackiev Software sells Hyperstudio 5), who spent some time showing me the ins and outs of Hyperstudio AND a chained Bible from the 1500s!  I wish I had a photo of that


My next technology journey!

I have been having several interesting conversations with Roger Wagner, the creator of HyperStudio, lately about teaching with technology.   He passed on some great teaching ideas!      It would be really fun to use my Lumens DC265 document camera and HyperStudio 5 to create a stop-action movie!   I could also record a “normal” movie and insert it into a HyperStudio stack to be part of a larger project for my students….the wheels are turning!   I sure wish there were more than 24 hours in a day!

To learn more about HyperStudio go to:  http://www.mackiev.com/hyperstudio/

Roger Wagner also has an area on Facebook for folks interested in sharing their ideas about how to use HyperStudio in education called HyperFest Central

If you use HyperStudio PLEASE send me some of your projects, I would LOVE to see them!  I am just re-learning HyperStudio after taking a long vacation.   When I create my first project I will be sure to share it here!


Analytics Plugin created by - Powered by Womens Sunglasses and Human Services Degree.